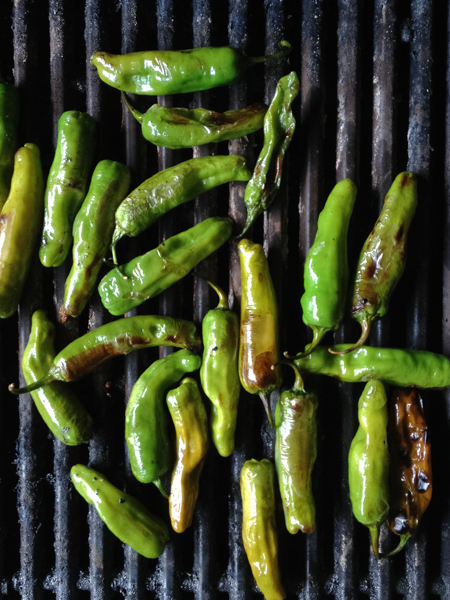
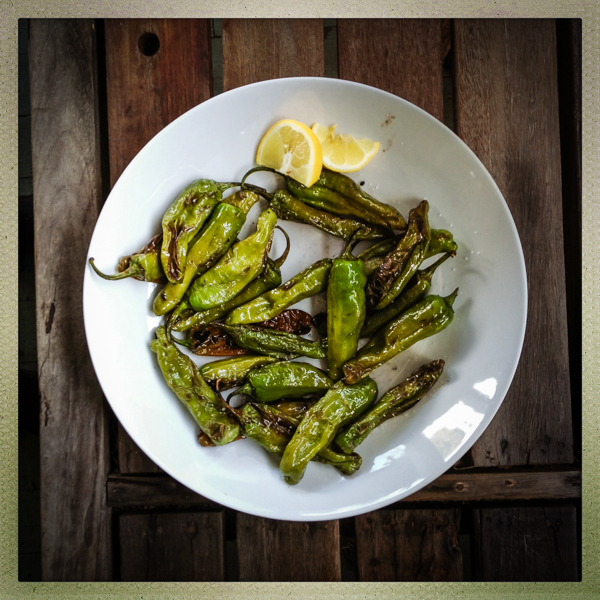
This mild pepper from Japan has become quite the culinary rage over the last handful of years. I first had them as a snack in a benefit cooking master class for Slow Food NYC, and have been growing them in my garden ever since. Shishito peppers are slender, bright green, and about the length of your index finger. They are super flavorful yet mild, with about one in a dozen delivering a memorable amount of heat. Consider it a party game. I love serving a huge platter of grilled shishitos with cold cocktails at the start of a big summer dinner party. Quick, easy, impressive, slightly unusual and pretty much universally adored--there should be no hesitation in adding these to the menu. Padron peppers can be prepared and served the same way, but will be hotter in flavor overall. We are in high shishito season right now, so keep an eye out at the market, and definitely grow your own next summer.
| ||||||||||||||||||||||


 I love this dressing and use it all year long--but particularly in the summer over a bowl of fresh sliced cucumbers, or a batch of quick-blanched fresh broccoli or green beans, or sauteed greens, all from the garden. I love this dressing and use it all year long--but particularly in the summer over a bowl of fresh sliced cucumbers, or a batch of quick-blanched fresh broccoli or green beans, or sauteed greens, all from the garden.Toasted sesame oil, one of my most favorite pantry staples ever, is widely available, but if you pick it up in an asian market or anywhere in Chinatown, it will be dollars cheaper per bottle.
| ||||||||||||||||||||||


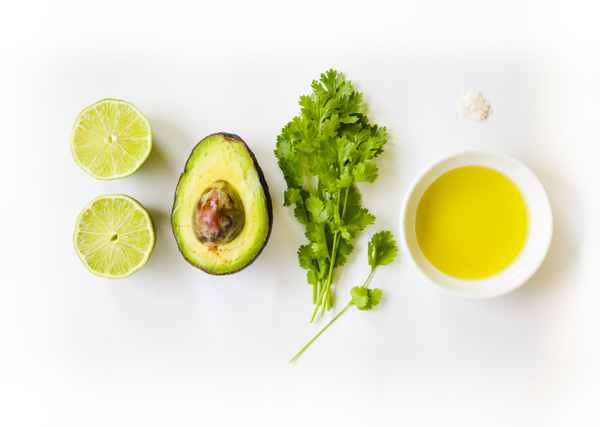
I made this quickly in the blender this week, to go over a cold rice salad with shredded poached chicken, local corn, a few early tomatoes and chunks of avocado. Mostly the goal was to distribute the little bit of avocado I had on hand as much as possible throughout the salad. We loved the result, and I expect we'll be drizzling this all over salads, soups, sandwiches, and all sorts of grilled things all summer long. Creamy Avocado Lime and Cilantro Dressing By Catie Baumer Schwalb makes about one cup. 1/2 avocado 3 tablespoons fresh lime juice, from one large lime, or a few smaller 1/4 cup, packed, fresh cilantro (include stems too if they are young and fresh) 1/2-3/4 cup olive oil salt, to taste In a blender, combine avocado, lime juice and cilantro. Blend until smooth. Through the hole in the blender lid, slowly pour in the olive oil, with the blender on low. Start with a half cup, and taste for balance. If it seems too tart, add a little more gradually, tasting as you go. Season with salt, to taste. Serve immediately, or chill briefly. | ||||||||||||||||


Make this right now, with all those plump ephemeral strawberries lurking around. (If you are making this out of season--gasp--consider adding a small pinch of sugar to the berry puree to help boost the flavorless winter berries). If you can make it past eating it directly from the mixing bowl, serve this dressing over a spinach salad with toasted pecans or walnuts and some crumbly goat cheese. Or dip some grilled chicken into it. Or grilled pork. Or duck. Or heck, put that on the salad too. Oh, and do yourself a favor: get some really good balsamic vinegar.
| ||||||||||||||||||||||


 Last night I was having dinner with some of my favorite lady friends, and we were talking about salad dressings, as you do with your lady friends. They were saying that they each always make their same standby dressing, and were enjoying this new blog feature to help get out of their ruts. We shared what each of our quick, don't have to think about it, dressing recipes are, and I had forgotten that for the longest time this one was mine. The mellow rounded sweetness of the sherry vinegar and the rich roasted nuttiness of the hazelnut oil are a combination that is tough to beat. It also makes one of my favorite birthday or hostess gifts. A bottle of each, and perhaps some great salad servers, have yet to make anyone unhappy. Use this dressing as an excuse to use up any hazelnuts that are left over in your pantry from some long-forgotten holiday cookie recipe. I love subtly mirroring the dressing in the salad ingredients.
| ||||||||||||||||||||||


 For another step in my continued fight to close down the salad dressing aisle in grocery stores, I'll offer you a homemade salad dressing recipe each week. Fresh oregano certainly has a pronounced flavor, but actually so much more mellow and herbal and complex than what dried drab green flecks and pizza restaurant shakers have lead you to believe. We had this dressing last night on crisp fresh red leaf romaine, a small handful of fresh sorrel leaves (both sliced into ribbons, both from our garden), cucumber, and a generous handful of toasted sesame seeds. This vinaigrette would also be incredible on a salad of baby spinach, chickpeas and sliced hardboiled egg, or as a base for a potato salad. Also, P.S., oregano is probably the most idiot-proof herb to grow, super hearty, pops up first in the spring and faithfully returns each year. Grab a plant and stick it almost anywhere in your yard now for years of salad dressings and marinaras to come.
| ||||||||||||||||||||||


When I refer to our microfarm, I am talking about just over five thousand square feet of heirloom gardening spaces, that my husband and I have carved out, cared for, slowly added to and greatly benefitted from for the last almost decade. Our home sits on a very rural, mostly wooded, forty-five acres, so anytime we felt like we could handle a little more weeding, or heard from enough friends what a thrill it was to dig up potatoes in the fall—in went another sizeable garden space. Until we are now left with our own personal work camp in the Catskills. Collectively, this year is the largest to date. Two summers ago I was well into my pregnancy, and not so agile in the bending-digging-weeding routine. Last summer we had a seven month old son who cut our two-person-powered time to bend-dig-weed exactly in half, needing to be nursed or held or kept out of the fierce sun by one of us almost at all times. Each season we vow to go easy on ourselves. Each season we do just a little more than what would be considered sane. Compared to previous years, we felt like we had it wholly together this time, and are planted to capacity—despite the fact that the plan had been to leave our oldest and largest space empty for a season to sensibly replenish. But I once again fell victim to the gorgeous seed catalogues, web sites, and that plant pusher, Trina, at the incomparable Silver Heights Farm, and can not cut myself off once my palms get sweaty and pulse quickens. Because in the end it is about food! Food I remember from some meal, food I can’t easily buy around these rural parts, food I can’t get until this time of year, food I have been dying to try to cook with, and more than anything, food I am picturing laying out on a giant rustic white platter and presenting to a dozen or so dear friends seated around the table made of antique barn wood on our porch. How can I possibly expect to limit myself? (more…) | ||||||||||||||||


Something to do with asparagus right now...(and what I'm having for dinner.)
| ||||||||||||||||||||||


Full disclosure: in season or not, I use a lot of scallions. I love their subtle oniony vibe, pop of color, and exotic feel. I love their tubey shape and making thin cuts on an extreme angle for geometric garnishes. I love that they are equally useable raw or cooked. I LOVE them in my Homemade Scallion Pancakes and David Chang's Scallion Ginger Sauce from his Momofuku cookbook. So, each summer I faithfully devote an entire garden bed to growing my own scallions. And each year it is wildly unsuccessful. The seeds are microscopic, making it insanely difficult to evenly distribute them in the ground. When they do start to sprout up, in awkward clusters, they are the tiniest green threads, impossible to see and differentiate from the weeks that are intent on choking them out. But every year, I try, try again. So, cut to me on the subway a couple of weeks ago, overhearing a conversation between two adorable twenty-something hipsters, waxing poetic about the treasures on pinterest. Now I have not really explored pinterest, other than to see some referring pages that have come into my blog. And I have some mixed feelings about it from first glance. However, what I heard the DIYers going on and on about was the "growing scallions thing" on pinterest. Ok, I was curious and googled as soon as I got above ground. Apparently the scallion thing that has swept across the pinterestsphere, is the lesson that you can regenerate whole, perfectly edible scallions from the bottom tips that are usually cut off and tossed away. Yep. And I tried it. And yep. It works! Just place the root ends of scallions upright in about an inch of water and put in a sunny spot. In twenty four hours you will see some growth, and in just under a week they'll be full grown again. The only upkeep is to change the water every other day or so, which also helps cut down on any oniony smell. You can repeat the process three or four times with the same scallion tip. So excited to have a much more successful way of growing my own. And thrilled to add another vegetable to my eating local list--all year round. My apologies to the national scallion growers council.  | ||||||||||||||||


 Dame Paula Deen, amid mass fan hysteria (hysteria!), posing next to a pumpkin of her likeness (and Cat Cora's) at the Food Network festival at Chelsea Market a few years back. We were completely unsuspecting shoppers, caught, literally, in the swell. (Not unlike that terrified-looking couple coming out of the fish market behind her.) I am as big a fan of pumpkin carving and jack-o-lanterns as anyone, and definitely considered finally having a porch to put one on, one of the bigger perks of moving out of NYC. But I am equally as big a fan of pumpkins themselves, pumpkin seeds, pumpkin flesh, pumpkin vines, all of it. This time of year it is easy just to see said pumpkins as holiday flare. But particularly with tons (and tons!) of them at the markets right now, it is time to stock up and revel in all things orange and round. Seed Saving | ||||||||||||||||


[caption id="attachment_3026" align="aligncenter" width="640"]  http://www.pitchforkdiaries.com/2011/10/18/technique-tues…o-clean-a-leek/[/caption] http://www.pitchforkdiaries.com/2011/10/18/technique-tues…o-clean-a-leek/[/caption]Giant Musselburgh leeks from our garden. Though the few nights of just dipping down to a frost have demolished most of the delicate summer produce in our gardens, this time of year signals that our leeks are starting to reach their sweetest. Cousins of the onion, leeks too are many-layered, and because almost half of the plant grows underground, they have practically spoonfuls of dirt trapped in said layers. Cleaning them, to avoid an off-putting little bite of grit in your meal, is critical and a bit of a trick. However, it is also super simple and well worth the time for the reward of this gorgeous flavor-bomb available long into the winter. HOW TO CLEAN A LEEK | ||||||||||||||||


Dreaming of our trip to Barcelona, that was this month a year ago, I tried combining two of my favorites: spanish romesco sauce with just-picked spaghetti squash from our garden. Nutty, tangy, rich and warm, with a wonderful crunch from the squash, I literally had to make myself put the mixing spoon in the dishwasher so I would stop eating and have enough to photograph. Romesco is a very traditional spanish sauce originating in Catalonia. It is incredibly rich and creamy, thanks to pulverized toasted almonds and hazelnuts included to thicken the sauce, that also provide an extra dose of protein. As with most ages-old, traditional dishes, the recipe varies from cook to cook, including this cook, and is a reflection of how they view it most balanced. In addition to using it here with spaghetti squash, it is incredible with grilled fish and vegetables, as well as a dip, or spread on sandwiches. It is a great way to use up those few remaining, not-exactly-pretty, tomatoes and peppers looking for a home at the markets right now. | ||||||||||||||||


Spaghetti squash at the Jean-Talon market in Montreal. A complete delight and mystery, spaghetti squash was my favorite vegetable growing up. Though not terribly popular or widely available in the late 70s, somehow my grandmother was able to procure one at least once a fall. Into the oven as a hard, nubby, squash, then magically out of the oven and onto my plate, transformed into golden pasta-like strands that surprised me each time. Becoming much more common and available now, spaghetti squash are all over the markets (and my garden), and will be for months. It is technically a winter squash--ripening at this point in the season, and able to be kept in cold storage long into the cold weather--but with its golden color and light, buttery texture, is much more reminiscent of summer squash. A welcome bit of variety in a long season of dense, orange-fleshed cousins. Generally the rule of thumb is that spaghetti squash will keep for up to a month in a cool, dry area. Though the past couple of years, we have successfully kept ours that we grew for 3-5 months on a well aerated shelf in our basement, keeping an eye out for any that might be getting soft or imploding. Rubbing the outside surface with a thin coating of vegetable oil is said to keep fungus and mold spores from being able to take root on the surface of the squash, cutting down on deterioration, and extending their shelf life considerably. To cook Wash and dry the squash well, and cut in half lengthwise. This will be the hardest step. Make sure it is well dried, so your knife doesn't slip, and if helpful, cut off a small portion of either end to give yourself a more steady anchor. Scoop out the seeds and stringy flesh surrounding the seeds. Rub the inside of each half with olive oil and place, cut side down, on a baking sheet. Roast in the oven at 375 degrees for 35-40 minutes, until the skin just starts to give when pressed with your finger. Don't over cook, or allow to sit cut side down on the baking dish for long after removed from the oven, or it will become mushy and the strands will not be as nicely defined. When cool enough to handle, gentle pull the strands of the squash away from the sides with a fork, scraping right down to the skin. Very neutral in flavor, with a great, mildly crunchy texture, the spaghetti-like strands of the squash are a terrific blank canvas for a limitless variety of toppings. Pesto, garlic and olive oil, tomato sauce, puttanesca, meatballs, bolognese, or just butter with freshly grated parmesan cheese are all perfect pairings. I am also a huge fan of the spaghetti squash casserole recipe from the Moosewood Cookbook. With just forty-two calories and ten grams of carbohydrates per cup of cooked squash, this is a great side dish alternative to explore. Grab one at the farmers' markets this weekend.
| ||||||||||||||||


I just discovered the Telepan TV channel on youtube. Bill Telepan is one of my most favorite NYC chefs, who I had the great, great pleasure of cooking with for many months that the start of his inspirational and important Wellness in the Schools school lunch campaign. He has started to put together videos, sharing some of his incredible recipes from his incredible restaurant Telepan. The three recipes using cherry tomatoes in the video above are making me very. very. hungry. Run! and get some cherry tomatoes at the markets this weekend while they are still available (we had a frost at our house last night!). | ||||||||||||||||


 Glorious cobs of corn will still be around at the farmers' markets for a couple of weeks. Sweet, meltingly tender, golden or pearly white, they are never better (or cheaper) than right now. We eat it with dinner nearly every night for the month when it is at it's best, just barely cooking it, as it doesn't need much more, and then say farewell for another eleven months. However, we also religiously freeze corn to use in meals in the months ahead. Pulling out and defrosting a bag of farmer's market kernels feels so luxurious in the depths of winter--not to mention a tremendous vitamin-packed time and money saver. Great for chowders, soups and chili, I'll also combine the corn with my frozen peppers for a tex-mex-y topper for eggs, or a perfect start for fajitas and burritos. Slowly saute some onions along with them, and add a little cumin, chili powder, ground corriander, and epazote for a colorful, sweet, base for a meal. Glorious cobs of corn will still be around at the farmers' markets for a couple of weeks. Sweet, meltingly tender, golden or pearly white, they are never better (or cheaper) than right now. We eat it with dinner nearly every night for the month when it is at it's best, just barely cooking it, as it doesn't need much more, and then say farewell for another eleven months. However, we also religiously freeze corn to use in meals in the months ahead. Pulling out and defrosting a bag of farmer's market kernels feels so luxurious in the depths of winter--not to mention a tremendous vitamin-packed time and money saver. Great for chowders, soups and chili, I'll also combine the corn with my frozen peppers for a tex-mex-y topper for eggs, or a perfect start for fajitas and burritos. Slowly saute some onions along with them, and add a little cumin, chili powder, ground corriander, and epazote for a colorful, sweet, base for a meal.How to Freeze Corn (more…) | ||||||||||||||||


  | ||||||||||||||||


 These fritters are an homage to the perfect little hometown restaurant we had in our shoreline Connecticut town growing up in the 80s. A place where everybody knew our name, where you could pop in casually for a wholesome lunch, or count on it for a suitably festive and elegant special occasion dinner. I've been thinking a lot about food of that era lately. As a kid I was permitted to tag along on many grownup restaurant dates, luncheons and dinner parties, giving me the chance to try copious amounts of new foods, many definitely not considered on the childrens' menu. I remember these new tastes and textures more vividly than I do where I was or who I was with (go figure.) But what is most interesting to me in hindsight, is that what was 80s nouvelle cuisine, was in many ways using a huge amount of the same ideas of locavore cooking now--using the freshest possible ingredients, lighter sauces or preparation to let the produce or proteins really be the focus, an overall lighter, fresher, more in-the-moment way of cooking. The only difference being that then it seemed revolutionary and nouvelle, while today it is seen as a return to the basics. This fritter is exactly in keeping with that. The freshest possible ingredients, at the height of their season, minimally dressed up. In the 80s something like this seemed very exotic, today it feels like the perfect, summer, wholesome appetizer, right out of a Deborah Madison book. And plus...ding! ding! ding!...it is something to do with all of those zucchini piling up on your counters, that you perhaps might be starting to resent in just the slightest way.
 | ||||||||||||||||||||||


  | ||||||||||||||||


 Here is a quick recipe I dreamt up, while on my roasted produce kick this week, using what is in abundance in the gardens and at the market. Thankfully, it turned out to be heavenly, lick-the-bowl-clean good. There is a magical, sum is definitely greater than it's parts, result here, as with many very simple summer dishes (think: Tomatoes+Basil+Olive Oil.). Sweet and sour and earthy and salty and bright and crunchy all going on in your mouth together. Roasting the nectarines and zucchini really intensifies their flavor and makes them both feel like vegetables...or fruit...or something new and unique completely. A beautiful side dish for any summer meal, I imagine this would also be spectacular atop grilled fish, pork, or chicken.
 | ||||||||||||||||||||||


 By this point in the summer I definitely get into a rut and prepare fruit and vegetables from the gardens and market in almost the same ways daily. Not that that is a bad thing, as with produce this amazing, at the height of their season, there is often very little that can improve upon them. A little grilling here, a little lightly dressed salad there, a little sautéing tossed with fresh pasta over there… Vegetable and fruit roasting feels like almost too basic a technique to even justify a whole blog post. However, several times during the year I have these ah-ha moments where I am bored with what I have been cooking and then suddenly remember to mix things up I just need to roast, which I somehow forget about for spells at a time. The long exposure to dry heat and the contact with the surface of a baking sheet or roasting pan transforms produce in ways very different than grilling, steaming or sautéing. Most importantly it evaporates much of the water in the fruit or vegetable, drying it out some (Take that watery zucchini!), and deeply concentrating the flesh and the flavor. Also the edges of the produce start to get brown and sweet and caramelized and utterly irresistible after the natural sugars are exposed to heat and the surface of the baking dish. (more…) | ||||||||||||||||


  | ||||||||||||||||


Radishes of every color are pushing their way up through the dirt of my garden and attracting paparazzi-esque crowds at the farmers' market. This fresh and this young, they are sweet and mild, and add a peppery snap to salads and summer meals. Try some this week, with this so-easy-my-sheep-could-make-it recipe for irresistible radish, butter, and sea salt crostini. And don't compost the radish greens tops just yet. They are equally edible and equally wonderful. Treat them as you would other hearty bitter greens; sauteed and tossed with pasta, stirred into soups, or whirled into pesto. Here are a few ideas to try out from the kitchn.com. Enjoy! | ||||||||||||||||


 Here's another recipe to break up your asparagus monotony (that is, unless you are coincidentally eating sesame asparagus nightly). When cooked at its freshest, grilled asparagus spears are practically candy. Tender, sweet, nutty, with a slight tang from the rice vinegar, this recipe is a natural in asian-inspired meals. Try it alongside grilled chicken or salmon (using the same dressing as a marinade for those too), or tossed with noodles. I imagine the stalks would be stunning draped across a big platter of this peanut noodle dish from ramshackleglam.com. They can definitely be grilled a day ahead and served cold or at room temperature, for an excellent effortless entertaining side dish. Just save the final dressing and sesame seed tossing for right before serving.
| ||||||||||||||||||||||


 As hinted at earlier this week, asparagus is bustin' out all over on our micro-farm. One of the very first signs of a long season of fresh food from the gardens, this perennial faithfully returns each May, basically without us having to do a thing. (That's my kind of garden vegetable!) Since it is never better than right now, we'll eat just-picked asparagus almost every night for dinner for the next several weeks. Then finally, when we can't stand it anymore, which fortunately is right about when the asparagus season peters out, we'll put our asparagus habit to bed for another 11 months. Once you've had it this fresh and this good, you are spoiled for anything trying to masquerade as asparagus in the rest of the year. But it is a challenge to keep it interesting in the dinners ahead. Even as good as it is, when having asparagus almost nightly, sauteing, grilling, and soup-ing gets old quickly. This savory galette was a very welcomed change, and was gobbled up quickly last evening. It would also be wonderful for brunch, or cut in small squares for late spring hors d'oeuvres. I have been on a galette with corners kick this year, but feel free to form it in the more traditional round shape, or any free-form shape that works for you and your stalks.
| ||||||||||||||||||||||


 Chinese new year begins tonight at midnight. An integral part of the celebratory feasts are meat and vegetable stuffed dumplings. Called jiao-zi in northern China, they are typically eaten right at the start of the new year. Their crescent shape is reminiscent of the shape of ancient Chinese currency, silver and gold ingots, and eating them at the birth of the new year is thought to bring wealth and prosperity. When I first moved to New York City in the mid-nineties, I had my first taste of really authentic chinese dumplings. It was love at first slightly-burned-tongue. More of an obsession, to be honest, as I would devour as many as I could afford, as often as I could justify. Three years ago, my husband and I celebrated our honeymoon in China. I had the wonderful good fortune of being able to learn a tremendous amount about the cuisine, with trips to many local markets, tremendous meals, and some cooking lessons at the Cloud 9 cooking school in Yangshuo on the banks of the breathtaking Li River. One of the dishes we cooked in class were dumplings. Here is one of our lovely teachers explaining how to fold the rounds of dough into the crescent shape. http://www.youtube.com/watch?v=aphirz7wcbM So below are my recipes for both pork and vegetable dumplings. I have adapted them through the years from what I learned in that class, what I've learned from a big assortment of great cookbooks, and most definitely from what I've learned from eating this favorite of any food I can think of. On a desert island, these are what are coming with me. I am sure there are Chinese grandmothers who will find unauthentic hues in some part of my recipes. But they are as authentic as I've been able to learn through every best effort, and when I burn my tongue with that first divine chewy bite, send me back to China and Chinatowns I've loved, and make me feel very fortunate.
 | ||||||||||||||||||||||


It was announced yesterday that Mark Bittman's weekly column in the New York Times will end its thirteen year delicious, informative, enthusiastic, and encouraging run.
http://www.youtube.com/watch?v=kqChHSsf42c I have learned many lessons from Mr. Bittman's column. Starting in 1997, a year after I graduated from college, I cooked recipe after recipe from his writing and suggestions and road maps of seasonal dishes. His overarching philosophy of don't be intimidated, just get in the kitchen and make good, real food--"It's not rocket science"--is the cornerstone of what I deem most important in the work I do and what I am most trying to impart in this blog. His article The Well-Dressed Salad Wears Only Homemade in 2006, not only instantly convinced me to remove all store-bought salad dressing from my life, but also started my path of questioning any and all store bought food-stuffs. He sent my husband and I on a scavenger hunt through winding cobblestoned back streets of Genoa, Italy, and putting Genoa on our itinerary at all, because of his completely intriguing description of the hole-in-the wall greasy spoon, Trattoria Maria, as "one of my favorite restaurants in the world." It ended up being our favorite city of the trip---the trip on which we got engaged. His coverage of Jim Lahey's no-knead bread technique, sent me, and throngs of other eager cooks, out in search of hearty lidded cast iron cookware (according to the sales person at the Le Creuset outlet in Woodbury Commons: "Are you here because of The Bread?"), and got the country excited about making homemade bread. I encourage you to go back over his fun, relaxed and heartfelt collection of pieces, and cookbooks (How to Cook Everything, 2,000 Simple Recipes for Great Food Thank you, Mr. Bittman. Looking forward to what's next on the menu. A few of my favorites from the past years, that I return to again and again: Soto Ayam--Indonesian Chicken Soup with Noodles and Aromatics Chard Stuffed with Lemon Saffron Risotto and Mozzarella Chicken Biriyani 101 Simple Salads for the Season 101 Simple Appetizers in 20 Minutes or Less Almond-Apricot Granola Bars | ||||||||||||||||
 This remarkably simple, and remarkably comforting recipe has always been a part of our holiday meals. When she first started making it, my grandmother used to enjoy quizzing unsuspecting guests as to what the star ingredient was in the soup. It is so mellow, and balanced, and not cluttered with leek or potato, that it is actually hard to discern that it is simply the lowly turnip. As a kid we would slurp down bowl after bowl of this creamy winter favorite. It was always present at cold weather dinner parties thrown by my parents, as surprisingly, it was a safe bet to please a large crowd. Again, not attributes, if I think about it now, I would consider assigning to this particular vegetable. But try this one! It is wonderful, and makes me joyfully lug home heavy bags of turnips (white or purple) as soon as they arrive at the farm stands. It is a warm and soulful start to most of our Thanksgiving meals together.
 | ||||||||||||||||||||||


 My dear friend from graduate school, January LaVoy, just opened her luminous performance in Arthur Kopit's Wings, off-Broadway at the Second Stage Theater this past weekend. When I had the chance to see the show, I thought, "Anyone can bring flowers...I'll lug down a just-picked squash from our garden." I mean, who wouldn't want to be greeted with that in the lobby??? (and have to deal with it on the subway home?)  This particular winter squash is an heirloom variety, called Thelma Sanders Sweet Potato Squash. I bought these seeds specifically because it was described by Seed Savers' Exchange as their "favorite two-serving baking squash". I envisioned romantic squash dates all winter long. It is pale orange like a butternut, but tear-shaped and ribbed like an acorn. It has a creamy, golden flesh, that works in recipes for either variety. So, as promised, here is a recipe of something to do with said squash, especially for our big star. And Wings runs through November 21st. If you are in NYC, don't miss this one.
 | ||||||||||||||||||||||


Though apples are excellent long-keepers, and will be around for months at the markets, they never taste better to me than right now--sun still warm in the sky, "transition" jacket getting pulled out of the closet, leaves crunching beneath my feet, and halloween fast approaching.
 Grab a few extra apples at the farmers' market this week, and try this salad I posted in the early spring. Pea shoots might still be available, but if not, late season salad greens, particularly arugula, would be a great addition. Pea Shoot, Celeriac, Apple and Hazelnut Salad | ||||||||||||||||


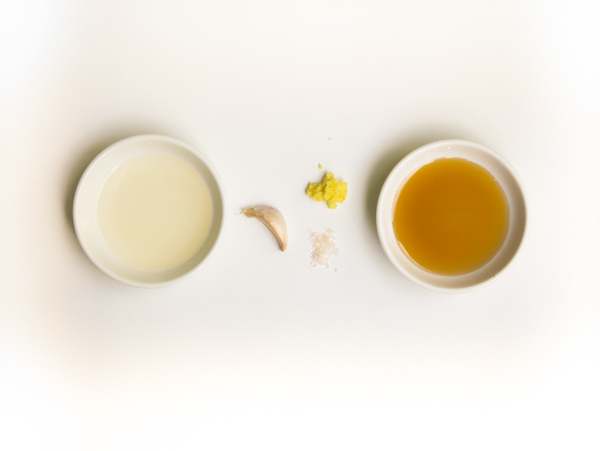
As a follow-up to my previous post about all things salad dressings, here is a recipe for another rock-star of a vinaigrette, following the same formula: 1 part acid + 3 parts oil + seasonings and flavoring ingredients.
This is dynamite tossed with fresh blanched local beans, perhaps adding soba noodles for downright craveable homemade sesame noodles. But it is also wonderful as a marinade for grilled chicken, beef, or pork, with the acid of the vinegar bringing the added bonus of a great meat tenderizer.  SESAME GINGER VINAIGRETTE RECIPE By Catie Makes approximately ¼ cup Rice Vinegar, 1 TBS Garlic, ½ clove, crushed and finely chopped Fresh Ginger, ½ tsp, grated Toasted Sesame Oil, 3 TBS Salt, to taste Combine the vinegar, garlic and ginger in a bowl, and allow to sit for 10 minutes, to infuse the vinegar with the flavor of the garlic and ginger. Then, while whisking constantly, pour the sesame oil into the bowl in a slow, thin stream. Taste, and adjust salt. Serve as a dressing for a green salad, tossed with cooked vegetables (green beans, broccoli, carrots, sautéed greens) or as a marinade for grilled meats. SESAME GREEN BEANS RECIPE Blanch green beans, by cooking in a pot of boiling, heavily salted, water for a few minutes, until crisp-tender. Immediately remove with a slotted spoon to a bowl of ice water to shock to stop the cooking. Drain and pat dry. Toss with Sesame Ginger Vinaigrette and toasted sesame seeds. Can combine with noodles, like Japanese buckwheat Soba noodles, for a more substantial dish. Top with slivered scallions and toasted sesame seeds. | ||||||||||||||||


 Just about four years ago, Mark Bittman wrote a great piece in the New York Times; A Well-Dressed Salad Wears Only Homemade, and it got me thinkin'. Why did salad dressings feel like such a mystery? Why is there usually a huge amount of grocery store real estate devoted to them? Why are they so darn expensive? A recent peek at dressings in my grocery store upstate, showed even the cheapest dressings at around $2.50 for an 8 oz bottle, jumping to $3.59 a bottle for something just slightly more natural. That's $40-57 a gallon--compare that to something like the price at the pump, and it feels like complete lunacy. The other glaring issue I noticed was that sugar, often in the form of high fructose corn syrup, and WATER, frequently make up two of the first three ingredients. Again, lunacy.  A few weeks ago I did a cooking demonstration at a local harvest festival. Showcasing the gorgeous local produce (supplied by Beaver Dam Brook Farm in Ferndale, NY), I did a brief primer on dressings and vinaigrettes. As I was myself when I first started cooking, many of the audience members at my cooking demos were surprised at how fast and simple it was to make a vinaigrette. And so much less expensive while eliminating chemicals, emulsifiers, and that big dose of unnecessary sugar. It seemed crazy that there we were, at a huge farmers' market, a group of people devoted to buying the freshest, least traveled, produce, and yet were not thinking much about then topping that produce with something that was possibly over a year old (when purchased, not to mention the time it has sat on that narrow shelf on the door of your refrigerator), gooey, syrupy, and most likely swimming with ingredients from a factory and not a farm. A few weeks ago I did a cooking demonstration at a local harvest festival. Showcasing the gorgeous local produce (supplied by Beaver Dam Brook Farm in Ferndale, NY), I did a brief primer on dressings and vinaigrettes. As I was myself when I first started cooking, many of the audience members at my cooking demos were surprised at how fast and simple it was to make a vinaigrette. And so much less expensive while eliminating chemicals, emulsifiers, and that big dose of unnecessary sugar. It seemed crazy that there we were, at a huge farmers' market, a group of people devoted to buying the freshest, least traveled, produce, and yet were not thinking much about then topping that produce with something that was possibly over a year old (when purchased, not to mention the time it has sat on that narrow shelf on the door of your refrigerator), gooey, syrupy, and most likely swimming with ingredients from a factory and not a farm.So here's the basic formula: 1 part acid + about 3 parts oil + seasonings and flavoring agents Put the acid in a bowl with the seasonings and flavoring ingredients, if using. If you have time, allow that to sit for 5-10 minutes to better infuse the vinegar. Then while whisking continually, pour the oil into the acid, in a slow, steady stream. The mixture will begin to come together and emulsify. You can also do the same, a bit quicker, with a fork for a "broken" vinaigrette. Or make things very easy and put it in a blender, instead of a bowl, in the same order, streaming the oil in the top while the blade is going. This works particularly well if adding fruit or vegetables for flavor. Most commonly, extra virgin olive oil is used, but gorgeously flavored hazelnut, walnut, pumpkin seed, and avocado oils are also becoming widely available. The acid can be lemon juice, lime juice, vinegars (balsamic, white or red wine, sherry, rice, cider) or a combination. Season with salt and pepper, and flavor with shallot, garlic, mustard, pureed fruit or juice, honey, pureed roasted vegetables, fresh herbs, dried herbs, or ground spices. One of my favorites is a three-ingredient vinaigrette of lemon juice, sea salt, and hazelnut oil over a green salad with roasted beets. Experiment with some of these combinations: olive oil + white wine vinegar + dijon mustard (just a dab), minced shallots and garlic (a classic) grapeseed oil + rice vinegar + fresh mango (pureed in a blender), season with salt and pepper to taste olive oil + sherry vinegar + roasted red peppers (again season and puree in a blender) walnut oil + white wine vinegar + roasted fennel and roasted garlic olive oil + lime juice + honey and ground cumin or this Roasted Cherry Tomato Vinaigrette, I posted recently. The formula is simple, it's not rocket science, you can hardly go wrong, and the options are so much more rewarding than the same-old same-old you'll find on the dusty eye-level shelf at your store. Do yourself a huge favor, work this into your life. Experiment, taste, and experiment some more. Tonight. | ||||||||||||||||


Red hot chili peppers. Sweet orange bell peppers. Long curly Jimmy Nardello peppers. Short stubby serrano peppers.
All of them. Peppers are still abundant at the farmers' market, super sweet this time of the season, and the easiest vegetable to put away for the winter months. You don't need to peel them or blanch them or can them--they can be frozen raw! Instructions: Wash the peppers and dry thoroughly. For larger, sweet or bell peppers, cut in half lengthwise, and remove stem, seeds and ribs. They can be left in halves or sliced smaller. Smaller peppers, particularly tiny chili, jalapeno or serrano peppers can be left whole. Put in resealable freezer-safe bag or container and freeze. That's it. Alternatively, if you want have more control over how many you use at once, place trimmed pieces in a single layer on a cookie sheet, and freeze. When frozen, transfer individually frozen pieces to resealable freezer-safe container or bag and return to freezer. (This method also works great when freezing individual berries.) Peppers do lose some of their crisp texture when frozen and thawed, but these are great to slice up and saute with onions, cumin and herbs for a quick fajita, burrito, or omelette filling, or to add to a slow simmered stew. The hot peppers are easy to slice finely when frozen, returning the rest to the freezer, to add just a small shot of heat to a dish. Above all, they are packed full with flavor right now, far outshining anything you will find them passing off as a pepper in February. Don't delay!  | ||||||||||||||||


 Our 52 heirloom tomato plants are in their final days, but have heroically yielded hundreds of pounds of beautiful fruit this year. A very triumphant relief, following the yield of six (yes, just six) tomatoes we got from the same number of plants last summer in the throws of the huge tomato blight. We are still managing to gather buckets of red, orange, and golden cherry tomatoes almost daily, though are even a little tomatoed-out after weeks and weeks of eating nothing but. This roasted tomato vinaigrette is one of our favorites, and so much so it was served over sliced local tomatoes at our wedding three Augusts ago, and printed on the back of the menu. As the weather gets cooler, and I automatically start to crave autumn foods, this hanger-on recipe from summer works beautifully over sauteed hearty greens, the last of the zucchini and summer squash, grilled pork, chicken or fish, as a tangy base for a stew, as well as a dressing for a simple green salad. I also love to can a few pints of it in our pressure canner to wake up meals, or dip crusty bread in, in the dreary days of winter.
 | ||||||||||||||||||||||


 First, yes, it is a terrible pun. But in all honesty, I had a dream about writing this post, and that is the title I watched myself type in the dream. So who am I to interfere with subconscious inspiration/intervention? Moving on... Our garden is still loaded with beautiful food. But as is the case when September shows up, the plants are not looking quite as robust as they did a few weeks ago. There is definitely a sign that it is the end of the season and these plants are tired. However, our gorgeous Five Color Silverbeet Chard, that was looking a little peaked in the hottest days of August, has started to really perk up in this last week, with it's cool evenings. I first started growing this heirloom variety of chard, after reading Barbara Kingsolver's glowing endorsement of it in Animal, Vegetable, Miracle: A Year of Food Life "If I could only save one of my seed packets from the deluge, the heirloom vegetable I’d probably grab is five-color silverbeet. It is not silver (silverbeet is Australian for Swiss chard), but has broad stems and leaf ribs vividly colored red, yellow, orange, white or pink. Each plant has one stem color, but all five colors persist in a balanced mix in this beloved variety. It was the first seed variety I learned to save, and if in my dotage I end up in an old-folks’ home where they let me grow one vegetable in the yard, it will be this one." Chard is a wonderful culinary green, loaded with iron and antioxidants. It stands up well in soups, and sautés, as well tarts and fillings. It is a great alternative to spinach and kale, and unlike either, comes up early in the garden season and lasts through early frosts. With it too warm to have spinach in the garden lately, I substituted chard recently in Spanakopita-inspired phyllo purses. These little bundles are impressive and loaded with summer flavor. The filling is also equally good folded into larger phyllo pockets for a great lunch or vegetable dish.  CHARD, DILL, AND FETA BUNDLES by Catie makes approximately 30 hors d'oeuvres bundles, or 10 large pockets. 2 TBS Olive Oil 1 small Sweet Onion, diced small Large bunch of Chard, about 1 lb, tough stems removed and roughly chopped 1 TBS fresh Dill, chopped, or 1 tsp dried Dill 2 TBS fresh Parsley, chopped 4 oz Feta Cheese, finely crumbled 1 egg, slightly beaten Salt and Pepper, to taste 1/2 pkg of Phyllo Dough (8 oz) melted butter Heat the oven to 350° F. Heat the oil in a large pan. Add the diced onion and gently saute until fragrant and translucent. Add the chopped chard, in large handfuls, as it starts to wilt down. Saute for a minute more until just cooked, adding the dill and parsley about 30 seconds before removing from heat. Using either a spoon on the edge of the pan, or pouring the mixture into cheesecloth, squeeze out and drain as much liquid as you can from the vegetables. Add the feta cheese to the chard mixture and evenly combine. Taste the mixture at this point before seasoning. Feta is salty and you may only need to add pepper. Once you are happy with the seasoning, add the egg and mix well. Unwrap the phyllo dough, and keep flat under a damp towel or paper towels. On a counter or cutting board, place one sheet of dough. Brush dough lightly, but evenly, with melted butter, and top with another sheet of dough. Repeat so you have a stack that is three sheets thick. With a large knife or pizza cutter, cut sheets into 6 pieces (down the middle the long way, and then in thirds in the other direction). Place about a tablespoon of chard mixture in the center of one of the phyllo rectangles, gather up corners, and twist slightly in one direction. Place on a cookie sheet. Repeat with remaining mixture and dough sheets.  Alternatively, you can cut the stack of three sheets in half, lenghwise, put about 1/3 of a cup of mixture in the lower right corner, and then fold in triangles, as you would fold a flag. Bake for 15-20 minutes, until dough is golden brown. Bakelightly longer for the larger triangles.  | ||||||||||||||||


 Our few small winter squash plants, that I started from seed this year, have taken off, and taken over, and are now literally climbing the walls of the new squash garden we put in. It is still amazing to me that one tiny 1.5 cm long seed can turn into a gigantic sprawling little-shop-of-horrors-like vine with leaves that are waist-high. Looks like we will pretty certainly have an abundance of squash, and currently have an abundance of glorious, delicate, and elegant squash blossoms. If picking them yourself, try to do it early in the day, when they are open and slightly more resilliant--they tear very easily. Also, you'll want to pick the male flowers, as the females are the ones that the squash will grow from. So with our glut of blossoms, guess I'll just have to stuff them with creamy cheese and fry them, fry them, fry them. 
 | ||||||||||||||||||||||


Ummmm...eggs...ramps...potato...
 When my brother returned from his junior year in Spain, he craved the egg tortilla espanola found on the counter at most tapas bars and eateries. It also happened to be one of my favorite recipes I learned in my "egg" lesson in my first weeks in culinary school (thank you Chef Justin). The farmer who I get my ramps from, Rick Bishop, has mentioned to me a few times how much he likes to cook ramps and eggs together. With a good amount of my own foraged ramps still left, this turned out to be a great combination.
 | ||||||||||||||||||||||


 This past weekend friends who live near us upstate, on an area overrun with ramps, graciously invited us over for our second annual swap of all-we-can-pick ramps for a pick-up truck full of our "like gold" sheep manure for their garden. (So very cutting-edge-hipster-locavore. Then again, poop for weeds...) After a very muddy morning, we brought home two substantial garbage bags of ramps with their roots and soil intact, to transplant to our woods, and a very generous shopping bag of loose ramps to cook and eat. I got to work on a big batch of these slightly hot, slightly sweet, bright and tangy pickled ramps that night. I am now addicted, and looking forward to ice cold pickled ramp martinis later this summer. Oh, and picked ramps also go brilliantly with fish and roasted meats, on sandwiches, or alongside cheeses and charcuterie.
 | ||||||||||||||||||||||


On a trip to the farmers market it doesn't serve you to bring a list or to have rigid expectations. The most effective shopping there is always done by just discovering what is the very best of this week's offerings. As mentioned before, that can sometime be rough in the less produce-friendly times of year.
 This week the stars, or farmers, seemed to align. There are a few bonuses of spring starting to show up, and enough cold storage winter vegetables left to anchor a recipe. I found sweet, plump shallots, an abundance of hearty greens, luscious queso blanc made from goats milk, and had a few bags of organic polenta from a farm in Ithaca, NY, I had stocked up on during a previous market day. They all came together beautifully in this comforting, yet bright dish. A great vegetarian meal, or elegant side dish, that could be easily expanded to a more substantial meal by adding some braised chicken thighs or aromatic local sausages to the mix on top.    
 | ||||||||||||||||||||||


 One of the toughest parts of eating almost exclusively locally in Upstate, NY, is the lack of bright, refreshing, crunchy, raw foods and salads in the colder months. We are overflowing in hearty carrot and squash soups, but there are definitely days I would kill for the snap of a thick slice of fresh cucumber. This week, particularly with the few amazing days of spring-promised sunshine we've had, I was already dreaming of getting started on my gardens, and craving some food of much warmer months. I did, however, gather at the farmer's market a collection of ingredients that came together for a great salad. When tested on my husband, the review was-- "Refreshing!". Perfect.    PEA SHOOT, CELERIAC, APPLE AND HAZELNUT SALAD by Catie Serves 4 2 large tart green apples (I used Mutzu apples from Migliorelli Farm) 1 medium celeriac (from Muddy River Farm in Goshen, NY) Medium handful of pea shoots, about 1 oz (from Two Guys from Woodbridge hydroponic farm, in Hamden, CT) 1/4 cup toasted and chopped hazelnuts for the dressing: 1 tsp apple cider vinegar 1 TBS hazelnut oil salt and pepper to taste. Cut the rough exterior off the celeriac, and cut the inner white part into thin matchsticks. Bring a pot of salted water to a boil. Have ready a bowl of ice water. When water is boiling, put in cut celeriac and blanch until al dente, about 30 seconds, depending on the size of the pieces. Immediately scoop out with slotted spoon and shock in ice water. Drain and dry. Cut apples in small cubes. Wash and dry pea shoots. Put cider vinegar in large bowl. Slowly add hazelnut oil in thin stream while whisking constantly. Season with salt and pepper. Add celeriac, apple, pea shoots, and hazelnuts to bowl. Toss with vinaigrette. Gently mound salad on a plate. Sprinkle top with a few more nuts.  | ||||||||||||||||


 After the 3+ feet of snow we had this past week, I find it impossible to believe that I am watching even more flurries outside today. The blizzard this week caused the farmers, whose work ethic is only outdone by their good sense, to not come to NYC for the greenmarket this Friday. Union Square, though stunning all decked out in white, was empty. Fortunately last week I bought a lot of long-keeping root vegetables. Perfect tools for a shut-in day upstate, with no takeout around for miles.  WINTER CHICKEN “NOODLE” SOUP WITH DILL PARMESAN CRISPS By Catie Serves 4 For the Soup: 2 quarts Chicken Stock 1 medium Celeriac, about 6 oz, peeled and shredded or sliced thin 2 medium Parsnips, about 6 oz, peeled and shredded or sliced thin 3-4 Carrots, about 6 oz, peeled and shredded or sliced thin salt to taste For the Crisps: 1 packed cup Parmesan Cheese, grated 1 tsp Fresh Dill, finely chopped (I used dill I had frozen from our garden this summer) For the Crisps: Preheat oven to 350° F. Thoroughly mix grated parmesan and fresh dill together in a small bowl. Make small mounds (about 2 TBS each) of the cheese mixture evenly spaced on a silpat mat on a sheet pan. Gently flatten each mound into a disc shape—the cheese won’t spread much beyond where you place it. You should have about 6 discs.   Bake at 350° F for about 8 minutes—just until the melted cheese has reached the center of the discs, and the edges are just starting to turn golden. Don’t over cook, or they tend to get bitter. Let the crisps cool on the silpat. Gently remove with a thin spatula. For the Soup:  The vegetables can be cut in a variety of ways. The easiest is shredding them all in the food processor with the large grating blade. However, you can also use a mandoline for long thin strips, julienne them by hand, or (as I did with the celeriac this time) thinly slice with a vegetable peeler—which ended up looking the most like noodles. It is pretty to slice them in a few different ways, particularly if you have two vegetables that are the same color. The vegetables can be cut in a variety of ways. The easiest is shredding them all in the food processor with the large grating blade. However, you can also use a mandoline for long thin strips, julienne them by hand, or (as I did with the celeriac this time) thinly slice with a vegetable peeler—which ended up looking the most like noodles. It is pretty to slice them in a few different ways, particularly if you have two vegetables that are the same color.(The most important thing is to make sure that all the vegetables are relatively similar in thickness once they are cut, so they cook evenly. You can certainly stagger putting them into the pot if you have larger cuts, so they can all be finished at the same time.) Heat the chicken stock over medium heat to a gentle boil. Add the shredded vegetables. Bring the stock back to a boil, and reduce to a simmer until the vegetables are al dente—about 4 minutes total. Season with salt to taste. Portion into four bowls, and mound vegetables slightly in the center. Top with a Dill Parmesan Crisp.   | ||||||||||||||||


 So the very first meal of the blog, and of this year’s project: to cook from the farmers market, or my garden, and post recipes every week. So the very first meal of the blog, and of this year’s project: to cook from the farmers market, or my garden, and post recipes every week.As mentioned previously, this week’s trip to the Union Square farmers market included finding some gorgeous king oyster mushrooms and kale. The first time I saw king oyster mushrooms in the market about a year ago I was so intrigued by their size and shape. These were about 7 inches long and nearly two inches in diameter. I tend to be drawn to the geometrics and architecture of food, was excited by the prospect of being able to be able to have substantial pieces of mushroom in new shapes—large slabs, long matchsticks. Not to mention the lovely, delicate, buttery flavor and texture of these beauties. Though not local, we are currently right in the middle of blood orange season. (What Are Blood Oranges) The ones I’ve been eating this week are intensely purple inside with a deep berry flavor. They are always startling to cut into, and offer great color and sweetness in both of these recipes. It is also worth mentioning that we get just the best chickens and eggs every week, all year, from the local farm Quails-R-Us Plus located in Honesdale, PA (Google Maps: Quails-R-US Plus). Everything we’ve had from them has been spectacular, and their chickens are particularly amazing. Super succulent and flavor you couldn’t begin to expect from a store bought bird. Grab a chicken from a farmer at the green market and this recipe will sing.  Blood Orange Braised Chicken, with Sesame Kale & King Oyster Mushrooms By Catie Serves 4 For the Chicken: 1 3-4 lb chicken, quartered 1 ½ TBS vegetable oil 2 shallots, thinly sliced 1 TBS blood orange zest (from about 2 oranges) 1 TBS toasted sesame seeds 1 cup blood orange juice (from about 4 oranges) 1 tsp sherry vinegar 1 ½ cup chicken stock salt & pepper Heat oil in a dutch oven, or heavy bottomed pot. Season the chicken pieces on each side. When oil is shimmering, put chicken, skin-side first, in pot in a single layer. Brown on both sides. Remove to a plate. Pour off all but 1 tsp of fat. Sauté the chopped shallot, until translucent and fragrant. Deglaze the pot with blood orange juice, and then sherry vinegar. Add chicken stock and bring to a simmer. Return chicken pieces to pot (liquid should be halfway up the sides of the pieces—add more stock or juice if needed). Cover and simmer gently until chicken pieces are cooked through, about 35 mins, depending on size of the chicken. Remove chicken from pot, and cover to keep warm. Reduce the sauce remaining in the pot slightly over medium heat. Mix sesame seeds and blood orange zest together gently in a bowl and set aside. For the Kale & Mushrooms: 1 TBS vegetable oil 4 cups, packed, thinly chopped kale 2 large King Oyster Mushrooms, about a pound (feel free to substitute) Segments from 2 blood oranges 1 ½ tsp sesame oil 1 TBS toasted sesame seeds salt Sliced the lower, thicker, part of the king oyster mushroom on the bias into large oval slices. Cut the top, narrower, portion into smaller pieces or matchsticks. While chicken is cooking, heat half of the oil in a large saute pan or brush grill or grill pan. Sauté or grill the large disks of the oyster mushrooms. Remove from heat, season, and set aside. Add the remaining oil to the pan. Sauté smaller, or matchstick pieces of mushrooms. When halfway cooked, add Kale and continue to sauté. Right at the end, throw in segments of blood orange and any juice that has accumulated from them. Just before serving, toss with toasted sesame seeds, dress with sesame oil and season to taste with salt. Serve a few slices of grilled mushroom on each plate, with a heap of sautéed vegetables, topped with a piece of chicken and surrounded by sauce. Lightly sprinkle with zest and sesame mixture. | ||||||||||||||||


|
{ welcome! }
 Catie Baumer Schwalb is a chef, food writer and photographer, who splits her life between the city and the country. Not too long ago Catie was a New York City based actress and playwright for more than a decade. She has her Master of Fine Arts from the National Theater Conservatory, and her Grand Diplôme in classic culinary arts from the French Culinary Institute in New York City.
... Read More ≫
Catie Baumer Schwalb is a chef, food writer and photographer, who splits her life between the city and the country. Not too long ago Catie was a New York City based actress and playwright for more than a decade. She has her Master of Fine Arts from the National Theater Conservatory, and her Grand Diplôme in classic culinary arts from the French Culinary Institute in New York City.
... Read More ≫{ get in touch }
{ what's new }
September 12, 2015
August 19, 2013
August 15, 2013
August 13, 2013
August 1, 2013
{ favorites }
{ archives }
Appetizers / Breads & Pastry / Breakfast / Cakes / Canning / Condiments / Dinner / DIY foods / Drinks / Fall / favorites / Grains / Holidays / Local / Noodles & Pasta / Pies & Tarts / Poultry / Salads / Seafood / Snacks / Soup / Spring / Summer / Sweets / Techniques / Vegetables / Vegetarian / Winter /
{ currently reading }
|


