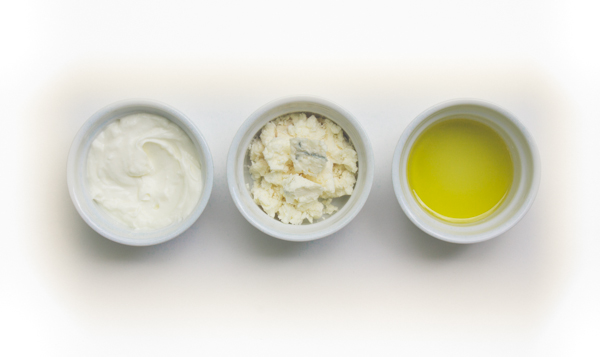
 This is a rich, luxurious, and even slightly healthier take on a classic blue cheese dressing. It certainly marries beautifully with a big old bacon-scattered wedge salad, or as a spread on a tomato and wheat toast sandwich. But also try it alongside grilled zucchini, eggplant, and even grilled peaches. Blue cheeses tend to be pretty robust and on the salty side, so taste as you go and you may not need to add any additional salt at all.
| ||||||||||||||||||||||


 I love this dressing and use it all year long--but particularly in the summer over a bowl of fresh sliced cucumbers, or a batch of quick-blanched fresh broccoli or green beans, or sauteed greens, all from the garden. I love this dressing and use it all year long--but particularly in the summer over a bowl of fresh sliced cucumbers, or a batch of quick-blanched fresh broccoli or green beans, or sauteed greens, all from the garden.Toasted sesame oil, one of my most favorite pantry staples ever, is widely available, but if you pick it up in an asian market or anywhere in Chinatown, it will be dollars cheaper per bottle.
| ||||||||||||||||||||||


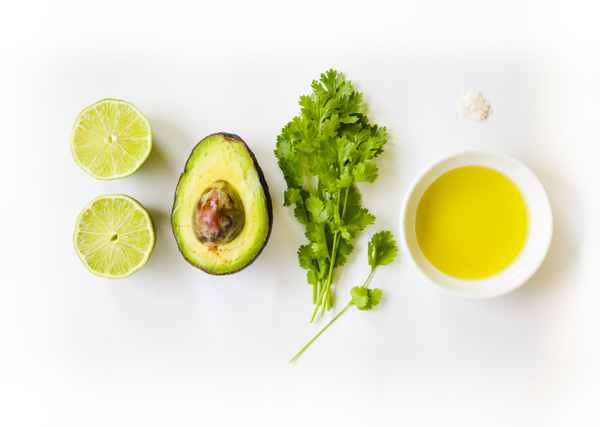
I made this quickly in the blender this week, to go over a cold rice salad with shredded poached chicken, local corn, a few early tomatoes and chunks of avocado. Mostly the goal was to distribute the little bit of avocado I had on hand as much as possible throughout the salad. We loved the result, and I expect we'll be drizzling this all over salads, soups, sandwiches, and all sorts of grilled things all summer long. Creamy Avocado Lime and Cilantro Dressing By Catie Baumer Schwalb makes about one cup. 1/2 avocado 3 tablespoons fresh lime juice, from one large lime, or a few smaller 1/4 cup, packed, fresh cilantro (include stems too if they are young and fresh) 1/2-3/4 cup olive oil salt, to taste In a blender, combine avocado, lime juice and cilantro. Blend until smooth. Through the hole in the blender lid, slowly pour in the olive oil, with the blender on low. Start with a half cup, and taste for balance. If it seems too tart, add a little more gradually, tasting as you go. Season with salt, to taste. Serve immediately, or chill briefly. | ||||||||||||||||


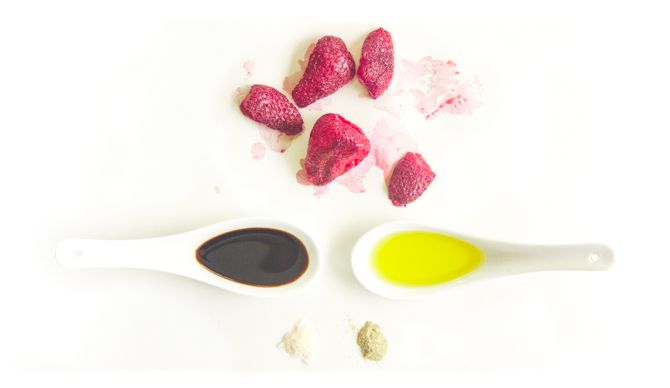
Make this right now, with all those plump ephemeral strawberries lurking around. (If you are making this out of season--gasp--consider adding a small pinch of sugar to the berry puree to help boost the flavorless winter berries). If you can make it past eating it directly from the mixing bowl, serve this dressing over a spinach salad with toasted pecans or walnuts and some crumbly goat cheese. Or dip some grilled chicken into it. Or grilled pork. Or duck. Or heck, put that on the salad too. Oh, and do yourself a favor: get some really good balsamic vinegar.
| ||||||||||||||||||||||


I love rhubarb. I love it for it's old fashioned vibe. I love it for it's color, striking tartness, and even for it's moderate shelf life. I also love it for showing up so darn early in the spring and sticking around for several months. And I too was at first intimidated by those long, irregular-shaped, tough magenta stalks at the market. I actually overheard a conversation at our market up here recently, where a woman who had just bought a weekend house near the Delaware discovered she had huge decades-old rhubarb plants growing on her property. However she didn't know when it was time to pick them. Nor did the young woman working the farm stand, so I jumped in with what I knew. She had been waiting for them to turn red, ripen, to pick. I explained that some heirloom varieties, have very little red, and the stalks can range from thin to the thicker more uniform we're used to seeing in grocery stores. I generally go by feel, but you can harvest stalks when between ten and fifteen inches long, avoiding letting them go too long and become tough, dry or woody. Once you get your rhubarb back you your kitchen, from yard or market, they really are one of the most simple fruit to prepare. Make sure all traces of the leaves are trimmed off, as they are not edible. Rhubarb have a bad rap for being stringy, as in celery stringy, but as long as they are cut in small pieces before cooked, the strings will not be a nuisance. For good measure, or habit, I tend to peel two or three strings off each stalk, from end to end, but not too much, as you are also peeling off any of the great magenta color. Wash the stalks well and then cut into slices between an half inch and an inch thick. You can then roast the pieces, throw them in to brighten up a rich stew, or as I do most often, simmer them down to a quick rhubarb puree or sauce. Pack the rhubarb into a sauce pan or small pot that holds the pieces sort of snugly. Add enough water to come up about 3/4 of the way up the sides of the slices, and simmer over a medium-low heat, until the rhubarb has broken down and is tender. Add more water if the mixture seems to be getting to dry or risking burning at all. When finished you can mash it up a little to have a sauce with more texture, or use a food processor, blender or immersion blender to give you smoother final product. If you are looking to use the sauce as a topping by itself, add about a tablespoon of sugar per large stalk of rhubarb when simmering down, or another classic way to cut rhubarb's intense sourness is to add at least 1 part strawberries for every 3 parts rhubarb when starting the sauce. Taste when finished and adjust sweetness if necessary. Vanilla beans, ginger, orange, cinnamon, almost all berries and apples are all great additions as well. Make a big batch. Eat it warm or ice cold. Spoon it over ice cream, blend it into cream cheese, swirl it in yogurt or oatmeal, drizzle it over a wedge of Stilton or duck or game meats, whisk it into your vinaigrette, blend it with ice for your margarita. Really, what other fruit, the northeast no less, is quite so versatile? | ||||||||||||||||


 For another step in my continued fight to close down the salad dressing aisle in grocery stores, I'll offer you a homemade salad dressing recipe each week. Fresh oregano certainly has a pronounced flavor, but actually so much more mellow and herbal and complex than what dried drab green flecks and pizza restaurant shakers have lead you to believe. We had this dressing last night on crisp fresh red leaf romaine, a small handful of fresh sorrel leaves (both sliced into ribbons, both from our garden), cucumber, and a generous handful of toasted sesame seeds. This vinaigrette would also be incredible on a salad of baby spinach, chickpeas and sliced hardboiled egg, or as a base for a potato salad. Also, P.S., oregano is probably the most idiot-proof herb to grow, super hearty, pops up first in the spring and faithfully returns each year. Grab a plant and stick it almost anywhere in your yard now for years of salad dressings and marinaras to come.
| ||||||||||||||||||||||


 April 1st. The "I think I can, I think I can..." continues. I think I can make it to the end of this relentless Catskill's winter. Right now, even as I type this, one day after we were admiring deep purple crocuses at my mother's for Easter, there are wide swirls of snow flurries mocking me outside the windows over my desk. But the garden seeds have been ordered. Seedlings will be started shortly. And our neon pink rhubarb stalks have just broken through the cold muddy ground. And chives. And oregano. Maybe ramps next. In the meantime, while I am fantasizing about warm weather cooking, getting to take daily advantage of vibrant fresh produce, with their bright colors and refreshing textures, I'm tucking away some other favorite produce, soon to be gone until the late fall. (more…) | ||||||||||||||||


Dreaming of our trip to Barcelona, that was this month a year ago, I tried combining two of my favorites: spanish romesco sauce with just-picked spaghetti squash from our garden. Nutty, tangy, rich and warm, with a wonderful crunch from the squash, I literally had to make myself put the mixing spoon in the dishwasher so I would stop eating and have enough to photograph. Romesco is a very traditional spanish sauce originating in Catalonia. It is incredibly rich and creamy, thanks to pulverized toasted almonds and hazelnuts included to thicken the sauce, that also provide an extra dose of protein. As with most ages-old, traditional dishes, the recipe varies from cook to cook, including this cook, and is a reflection of how they view it most balanced. In addition to using it here with spaghetti squash, it is incredible with grilled fish and vegetables, as well as a dip, or spread on sandwiches. It is a great way to use up those few remaining, not-exactly-pretty, tomatoes and peppers looking for a home at the markets right now. | ||||||||||||||||


 This may be the garnish to end all garnishes. I remember so vividly the day we learned this in culinary school, and how I raced home to try it myself, feeling like I had just unlocked some illusive five star chef secret. This simple little technique gives you magnificent, fragrant green gold to drizzle about a plate, swirl atop a bowl of soup (it floats!), and dunk very lucky crusty bread in. Seriously, this just smeared on a white plate, and you look like a superstar. Regular ol' oil becomes glistening emerald and is all things basil...or parsley or cilantro--it works for a variety of herbs. I made a thai basil-cilantro oil to drizzle around a Thai-spiced quail dish that worked beautifully. The oil will keep for about a week in the refrigerator. I've also frozen it in ice cube trays to defrost later in the year, to swirl on top of a creamy soup, or drizzle along side some roasted salmon. But try this now, even to just dress up some sliced tomatoes. There. Is. Nothing. Better.
| ||||||||||||||||||||||


 Basil has definitely arrived at the party. Bunch upon fragrant bunch are cramming tables at the markets. Not surprisingly we mostly think green and the same familiar scent and flavor when basil comes to mind. But there are loads of heirloom varieties that are becoming much easier to track down. (and grow yourself!) Try a new one on your next trip to the market. What's old will be a little newer again. Genovese Basil: The traditional Italian large-leafed sweet basil that we all know and love. Ideal for all things pesto, but best when the leaves are small. If the leaves are huge, blanch them quickly to remove some of the (too) strong flavor, making them more suitable for a delicately balanced pesto sauce. Holy Basil: Becoming more and more popular on menus with chefs, it is called holy basil primarily because it is used as an offering in South Asia in Hindu temples. Generally eaten raw, it has a bright, sweet smell, that is strikingly like Juicy Fruit gum. Thai Basil: This is those big fragrant sprigs strewn across your Thai green curry noodles, or tucked inside a Vietnamese summer roll. A deep magenta stem with small green leaves, it is much spicier than Italian basil. Heavy anise and clove flavors compliment Southeast Asian cuisines perfectly. Dark Purple Opal Basil: There are several purple basil varieties out there, and I always love to have at least one plant in my garden. Very similar in flavor to traditional Italian basil, it is a gorgeous way to add unexpected color to a dish. Thinly slice with green basil for instant edible confetti. Lemon Basil: Smaller leaves with a deep citrus smell and taste. A great compliment to seafood dishes, cocktails, and summer salads. | ||||||||||||||||


With our growing season a little later here in slightly cooler upstate New York, we still have bundles and bundles of garlic scapes in the markets and gardens for a week or two. A garlic scape is the flower shoot that has shot up from the stem of a hardneck garlic bulb when growing. The scapes are slender, bright green, and often twisting and turning in elegant swan-like shapes. Shortly after they appear, which seems to happen almost overnight, it is important to snap them off of the rest of the stem to allow the garlic plant to instead put its energy into growing the garlic bulb, which will be harvested a few weeks later. The scapes have a flavor that is definitely garlic, but much mellower, with hints of herbal summerness. They make a stunning pesto, turning into an outrageously bright green paste that keeps its color when cooked or frozen. I will often just puree garlic scapes with olive oil and freeze in about one cup portions that will keep for several months. Always on the lookout for new oils and vinegars for homemade salad dressings, this year I made garlic scape infused vinegar. It will still be a week or so before it hits its full potency, but so far so good, and the snaking scapes in the bottles are stunning if nothing else. The vinegar will be beautiful in simple vinaigrettes to dress greens and cucumbers from the garden, and also added to a marinade for grilling meat and seafood, splashed on sauteed chard, collards or kale, or for dunking crusty grilled bread. If your herb garden is overflowing, you can certainly add a few sprigs of basil, dill, thyme, or even a dried chili pepper to the bottle for your own personal melange. Experiment, use what is around you, and enjoy. GARLIC SCAPE VINEGAR 1-2 whole garlic scapes, about 12" in length 1 cup light flavored vinegar, such as white wine vinegar or rice vinegar Glass container non-metal cap or cover Note: I like the ratio of 1-2 scapes per cup of vinegar, but you can certainly add more to make the flavor more concentrated. And absolutely double or triple the recipe based on the size of container you are using. Triple the recipe, for example, if using a wine bottle. 1. Sterilize the bottle and cap, either by simmering in hot water on the stove for 10 minutes or washing in the dishwasher right before using. Allow to container and cap to dry thoroughly. 2. Wash garlic scapes and dry completely. Cut into lengths that will allow the scape to be completely submerged below the level of the vinegar. Any exposed piece of scape not in the vinegar will start to deteriorate and rot. 3. Gently bruise the scapes, by rolling over slightly with a rolling pin, to release a bit more flavor. 4. Place the scape pieces in the sterilized container and cover completely with vinegar. Cover with lid, cap or cork. 5. Store in the refrigerator, or other cool, dark place. The following day, check the level of the vinegar and add more if the level has dropped at all. It is possible that the scapes will absorb some overnight. 6. Allow to infuse for 10 days to 2 weeks, in a cool, dark place. Strain out original garlic scape pieces, if desired, and replace with fresh ones (if available), primarily for decoration. Will keep for 2-4 months. Keep vinegar bottle out of sunlight or it will become cloudy. The acid in the vinegar acts as an inhibitor for bacteria growth, but certainly keep an eye out for changes in color, an off smell, or cloudiness in the bottle and discard if there is a question. Storing the vinegar in the refrigerator, particularly in the summer months, is the safest.  | ||||||||||||||||


 The cilantro we planted in our garden around Memorial Day, has already started to bolt some from the heat in recent weeks--it is nearly July after all--and shortly will start to go to seed. Those seeds, as you may or may not know, are coriander. They will first be plump and bright green, a wonderful ingredient in and of themselves, then maturing and drying to the tan spice with which we are more familiar. They'll probably be showing up at the farmer's markets shortly too. Cardamom comes from a tropical plant, so probably won't be making any appearances at my New York State farmer's markets or gardens, but is a flavor that seems to scream summer and snuggle up exceptionally well with summer flavors. Peaches, apricots, lemons, pears, warm weather baked goods, and definitely coriander, all have a great affinity for pairing with cardamom. This soda syrup is a vacation in a glass on a steamy summer day. Mix it with seltzer (from my favorite appliance ever, the Sodastream Seltzer Maker Sip. Sip. Fizz. Fizz. CARDAMOM AND CORIANDER SODA SYRUP by Catie Schwalb Makes about 2 cups. 4 tablespoons whole green cardamom pods, crushed gently to expose inner black seeds 1 tablespoon whole coriander seeds 3/4 cup sugar 1 1/2 cup water Place coriander seeds in a small pan on medium-high heat. Toast gently, swirling frequently, until the seeds just start to become fragrant. Immediately remove from heat and pan. In a sauce pan combine sugar, water, coriander and cardamom. Bring to a boil, and then turn down to a moderate simmer for about three minutes, until all of the sugar has dissolved and the liquid is clear. Allow the syrup to sit and infuse with the flavors for at least and hour and up to overnight. Refrigerate if leaving for longer than a couple of hours. Strain syrup and discard spice solids. Store syrup in an airtight container in the refrigerator for up to five days. To make cardamom and coriander soda--Combine about 1 oz of syrup to 12 oz of seltzer, fill the rest of the glass with ice. Stir well. Adjust syrup, if you prefer a stronger flavor. Garnish with a slice of lemon. | ||||||||||||||||


With sorrel in its tangy, bright abundance at the farmers' markets now and throughout the summer, this pistou (or pesto or coulis) is a dynamite way to show it off. Set out a platter of baguette slices, ricotta, and the green stuff and let your BBQ guests at it for a DIY appetizer. Less work for you, no soggy for them. Or, as we did last night, set out a platter of it between you and your loved one on the porch and call it dinner. The lemony-green-herbal potency of the pistou is heavenly with the savory-creaminess of the homemade fresh ricotta. But it is also an incredible addition in any place where you want a little herby, slightly sour, punch. Toss it with warm pieces of boiled red potatoes for a new twist on potato salad, stir a small spoonful into a creamy root vegetable soup just before serving, toss with shrimp and orzo for a cold pasta salad, or drizzle over grilled vegetables, seafood, and chicken. This is also a wonderful recipe to use to put away sorrel for the winter. Make a big batch of the pistou and freeze in smaller portions, to stir into heavier winter dishes in the months to come.
SORREL PISTOU AND FRESH RICOTTA CROSTINI by Catie Schwalb makes about 1 1/2 cups of sorrel pistou For the Pistou: 3/4 cup, packed, fresh sorrel leaves, thicker stems removed, washed and dried thoroughly 1/4 cup, packed, fresh parsley, washed and dried thoroughly 1 garlic clove 1 cup extra virgin olive oil about 4 turns of fresh black pepper salt to taste, a large pinch at least For the Crostini: Fresh ricotta cheese thin slices of baguette, toasted or grilled if desired For the pistou: Combine sorrel, parsley, garlic clove, olive oil, salt and pepper in a blender or food processor. Blend until uniform and smooth. Taste and adjust salt and pepper to liking. Will keep in an airtight container in the refrigerator for up to a week, but is most green and most flavorful the day it is made. It can also be frozen, and thawed overnight in the refrigerator. Stir before serving. For the crostini: Top slices of baguette, or thinly sliced rustic bread, with a large dollop of ricotta. Top with a generous drizzle of pistou. Serve immediately. Alternative: HERB POTATO SALAD Steam or boil red skinned new potatoes. Cut into bite-sized pieces while still warm, but cool enough to touch. Toss with a generous amount of sorrel coulis. Chill before serving. | ||||||||||||||||


 A huge part of the allure of pungent, earthy, and exotic ramps, is that their season and availability is so fleeting. With only about a month to harvest until their flavor becomes too strong, the annual pilgrimages into the muddy woods for chefs and epicurians has commenced (or early-bird trips to the farmer's markets for the less adventurous, or more wise). But now also begins the search for ways to preserve ramps, to be enjoyed alongside the bounty of summer produce that is just a couple of months out of reach. I am a big fan of pickling ramps (and of pickled ramp martinis). This offers a great way to preserve ramps for months from now, if you can keep them around that long. I have also become smitten with ramp compound butter. Compound butter is nothing more than butter that has been mixed with herbs or seasonings, but the whole is much more exciting than the sum of its parts. It is a great way to add a little unexpected flavor or color to a meal, or to create an instant pain-free sauce for a dish. Now that you've mastered homemade butter, this is a perfect way to compliment your new home-spun delicacy. The flavored butter can be packed into a small ramekin or dish for slathering on warm bread, or rolled into logs, chilled and sliced. Top a hot grilled steak with a slice of ramp butter, and ooh la la. It is also beautiful on grilled fish, vegetables, dolloped on grilled oysters, or stuffed under the skin of a roast chicken. Try it when making scrambled eggs, whipped into mashed potatoes or polenta, or tossed with pasta and some grated pecorino. It will keep for several months in the freezer, giving you lots of opportunities to use ramps with foods that the weather isn't cooperating with just yet. Experiment and enjoy, and be the envy of all your foraging friends when their ramps have long run out.  RAMP COMPOUND BUTTER 1 lb unsalted butter 4-6 ounces ramps, white and green parts, depending on how concentrated you desire the ramp flavor zest of one large lemon salt, to taste Bring butter to room temperature to fully soften. Trim root end and wash ramps thoroughly, making sure to remove all dirt and grit in the layers near the root. Bring a pot of heavily salted water to a boil, and prepare a bowl of water with lots of ice. Blanch ramps in boiling water, for 30 seconds. Remove quickly and shock in the ice water to stop the cooking and preserve the bright green color. Drain and squeeze out as much water as possible. Spread ramps out on paper towel to allow to dry a bit more. Either thinly chop by hand, or mince in a food processor, the white and green parts of the ramps. Add lemon zest and then combine with softened butter. If you want a more uniform, very green, butter, puree it all together in a food processor (as in the photo of the butter above). If you want a more chunky, rustic butter, either fold the butter in by hand or use the paddle attachment of a stand mixer. Add salt, tasting as you go, if you want salted butter. If you think you'll be adding it to foods that are already sufficiently salted, perhaps don't add any or very little just to enhance the ramp flavor slightly. Pack compound butter into ramekins, small dishes, or air-tight containers and store in the refrigerator for about a week. You can also roll the butter into logs, either in parchment, wax paper, or plastic wrap, to be chilled and sliced. The compound butter can also be frozen for up to three months. Thaw in refrigerator overnight before serving. Recipe credit: Catie Schwalb. | ||||||||||||||||


 Ever since the first time I whipped my own fresh whipped cream, I have kept my gaze obcessively glued to it, in dreaded fear of over-whipping and having it turn into butter. The horror! Imagine! And so to this day I anxiously sweat that critical make or break, stiff peak to useless butter, moment. But wait...I can turn cream into butter? Thus making my own butter? And that easily? Well, yes, yes, and yes. I finally gave it a try this week, gleefully letting my mixer plow right through from beautiful lofty whipped cream to deflated heavier looking cream-paste to cheerful little golden globules of butter separating from ivory buttermilk. And all in about ten minutes. The transformation was kind of thrilling, and the result revelatory. A pint of heavy cream yielded about 6.5 ounces of butter and a cup and a half of buttermilk. Pound for pound this is will end up being a bit more costly than store-bought. However, I found the taste superior and just fresher all around, and it didn't have the "natural flavorings" that I just noticed on the ingredient list of my butter package. I cannot wait to try it with the outstanding, abundantly flavorful, local cream from farmers at the markets. There are also plenty of times when I have bought heavy cream for a recipe, or had extra whipped cream left over from a dinner, and wish I had used it to whip up some butter, rather than having it sit in my refrigerator waiting for another recipe to come up. This is a remarkably easy process and tremendously satisfying. Of all of the challenging and technical cooking projects I have attempted it is amazing that I haven't tried this before, as it is most definitely simpler than most. Give it a try. Slip some on the table at your next gathering. "Oh that? I just whipped that up." (more…) | ||||||||||||||||


My mother and grandmother, 1951. Just a year ago today I published my first blog post. There have been a bunch of changes over the year (including the name and url), but I am so thrilled where I have landed and am so excited for all that is ahead. In the past twelve months I've published 35+ original recipes, about 15 DIY tutorials, and am just shy of 80 posts--which included a handful of months I needed to be away from my laptop to get our heirloom vegetable micro farm planted, weeded, and thriving. I have finally managed to set up a Pitchfork Diaries facebook fan page, am no longer intimidated by twitter (@pitchforkdiary), and just this past weekend had an incredibly flattering feature on thekitchn.com. A splendid way to start year number two. Thank you so much for all of your invaluable interest and comments. More delicious days to come. Some of my favorite posts from the last year...
| ||||||||||||||||


In honor of last week's National Popcorn Day, I've done some tinkering in the kitchen with flavorings. My favorite project was coming up with different flavored salts. It is outrageous that I haven't done this sooner, and even more outrageous the number of super costly little precious jars of flavored finishing salts that I have sitting in my spice cabinet. The technique is nothing more than combining good quality salt, either kosher or sea salt, and good quality spices, herbs, citrus, or a combination. It is up to you as far as the ratio of salt to flavors, depending on how concentrated you want the flavor and the color, and how strong the ingredient is you are using. On average I used about 1 part flavor to 1 1/2 parts salt. Simply put all ingredients in a spice grinder, coffee grinder, food processor, or mortar and pestle and pulse or grind until well incorporated. Hint: For spices, toast them lightly first to release more of their flavor. Place them in a dry pan over medium heat, swirling frequently for a few minutes until they start to become fragrant. This powdery little flavor bomb is amazing sprinkled over hot fresh popcorn, and as a finish for so many of your dishes. It also looks gorgeous as a pop of color sprinkled around a plate. They'll keep for about a year in an airtight container, making them fantastic gifts. I mean, have you seen what these things cost lately? Here are a few ideas below, but the combinations are endless. Keep a little jar or two on your counter, and you'll find yourself using them on everything. Put a few small dishes on your dinner party table, and let guests play with their food. CURRY SALT I used a brilliant french version of an indian masala, called Vadouvan, from the exquisite Spice House in Chicago. Amazing on popcorn, but also chicken, fish, roasted vegetables (especially cauliflower), or a cold chicken salad. PIMENTON SALT Smokey, sweet, brilliantly colored spanish paprika. It rocked on popcorn. Would also be stunning on fried eggs, roasted potatoes, grilled shrimp, and roasted meats. CHIVE AND SHALLOT SALT I used some high quality freeze dried shallots and chives (again, thank you Spice House), resulting in a savory blend that exploded with the most amazing aroma as it hit the hot popcorn. It was also absurdly good on my poached eggs this morning, and the small batch is almost gone. Mashed potatoes? Yes. Roast Chicken? Yes. Just about anything you want to spruce up with a little savory brightness? Most definitely. Bonus points for drying your own homegrown chives. CITRUS SALT Zest the peel of a lemon, lime, orange, meyer lemon or tangerine. Allow to dry on paper towel, and then combine with salt. Poultry and seafood would be particularly good, as well as roasted peppers. VANILLA SALT Split and scrape a vanilla bean, and combine seeds with salt. Could have interesting results with some delicate fish and lobster, but I'm dreaming more of a stunning salty finish to a dessert, on a scoop of dense gelato, or a crunch on dark chocolate covered caramels. CHINESE FIVE SPICE POWDER SALT Get the best five spice you can, and then bring me the popcorn! ...And the roasted chicken wings, roasted pork, roasted brussels sprouts, and noodles. PORCINI SALT Pulse dried porcini mushrooms in grinder to a fine powder, and then pulse with salt. This earthy, chocolaty, elegant finisher adds a new element to a side of rice, a creamy pasta, eggs, a crostini with oozy cheese, or topping a puree of potato soup. LEMONGRASS AND KAFFIR LIME Dry both slightly, and grind with salt to make a bright, southeast Asian inspired topping. Beautiful in a ramen soup, on grilled fish or chicken, and even as an unexpected finisher to desserts.  | ||||||||||||||||


 First, I would love to have mouthwatering photos of fresh, succulent oysters, glistening under the spell of my dipping sauce. But alas, the shucking big snow storm this week kept my delivery from getting from the Chelsea Market to me in middleofnowhereville, and my dinner guests from being my oyster sauce guinea pigs. So you'll have to take my word for it, that it both tastes and looks spectacular. Thai food typically has a balance of four flavors: salty, sweet, sour, and spicy. This sauce is no exception, with sour lime, salty fish sauce, spicy thai bird chili (frozen from this year's garden), and a little sugar to balance it all out. I am a purest when it comes to slurping down those bivalve blobs of heaven, often eating them plain, or with just the slightest drizzle of a classic mignonette sauce, but there is something about this sour-herbal-savoriness that thrills me. It will also look like confetti in a bowl for your new years fete. Oh, and with all of the extra herbs and limes you have, try out a mint & thai basil mojito. 10...9...8...7...6....
 | ||||||||||||||||||||||


 There is little that will get me running to the kitchen faster than reading about a new (or most of the time, quite old) culinary trick to produce a food or ingredient that I had never thought about making by hand. Food and Wine magazine has a great feature this month on the Best Handmade Gifts. Included in that article is a recipe for homemade vanilla extract. Who knew? There is little that will get me running to the kitchen faster than reading about a new (or most of the time, quite old) culinary trick to produce a food or ingredient that I had never thought about making by hand. Food and Wine magazine has a great feature this month on the Best Handmade Gifts. Included in that article is a recipe for homemade vanilla extract. Who knew?The procedure couldn't be simpler: Combine 10 vanilla beans, split lengthwise, with 1 1/2-2 cups of vodka in a clean glass jar or bottle. Add a 1/2 cup more vodka, if needed, to completely cover the beans. Let sit for about 6 weeks in a cool, dark place. The extract is ready when the vodka is a rich, dark color and knocks you over with vanilla wafting from the jar when opened. If you'd rather not have the grainy vanilla bean seeds in your extract, pour through a coffee filter to strain. I also read in another extract article online, that you can make a second batch of extract with the same beans. Just fill up the container again with vodka when empty, and repeat the steeping process one more time. Yes, Christmas is only 3 1/2 weeks away, and well, Happy Hanukkah already. But I can certainly see giving this a start with the time you have, and then portioning it out for gifts, beans included in each bottle, with instructions to wait a week or two more before using. It would also make a lovely Valentine... Speaking of Valentine-- This year for Valentine's Day I gave my husband, the ice cream chef in the family, a half pound of glorious, moist, outrageously fragrant vanilla beans. I found an amazing online vanilla bean resource, Amadeus Vanilla Beans, and the totally indulgent bundle of about 50 beans, for about 65 cents each, far exceeded my wildest expectations. Start there. And here are a few great options for packaging up your gift portion of bean and extract: The Container Store Save on Crafts Specialty Bottle And finally, with New Year's right around the corner, while you are working with these same ingredients, how about also getting a larger glass bottle, using a slightly less vanilla bean to vodka ratio (2-4 beans per liter of vodka, depending on desired strength), and make homemade vanilla vodka. I mean, anyone can bring champagne to the party. Ho Ho Ho! | ||||||||||||||||


 I was recently asked to be a guest blogger for the wonderful heart-healthy food blog What Would Cathy Eat? Cathy asked for a cranberry sauce for thanksgiving, that was less sweet than usual. Here is the post and recipe below, in case you hadn't caught it on her site. --Catie For years, as a child at the 1970’s American thanksgiving table, I too believed that cranberry sauce was always cylindrically shaped, with neatly organized parallel rings encompassing it. That is not to say that my family were not great cooks, slaving for days before over dozens of homemade recipes. However, somehow that little wobbly dish seemed like a required fixture on the holiday table, that someone very well might miss if absent. Though it felt far from “food” and as a result, usually went untouched. It also seemed somewhat sacrilegious to think of smearing that puckeringly sweet jelly on that luscious turkey meat that I had waited an entire year for. How could this red goo possibly improve on roasted perfection? So I took a crack at it myself this year. Drawing on ideas of recipes like Duck with a Sour Cherry Sauce, or a deeply flavored Indian Chutney stirred into a chicken salad, ending up with a condiment that I would actually want to add to my turkey to add to it’s flavor. I eliminated a lot of the sugar found it most recipes (up to a cup of white sugar was common). It’s on the tart end of the spectrum, but balanced, with lovely spice notes that will be beautiful with the richness of the meat. I think it would also be outstanding dolloped on top of a bowl of Greek yogurt for breakfast the next morning, and though not yet tested, I imagine pretty great pureed and used as a base for a holiday prosecco cocktail.
 | ||||||||||||||||||||||


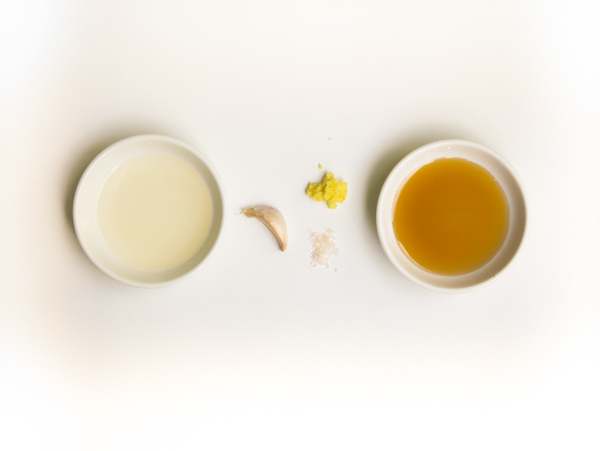
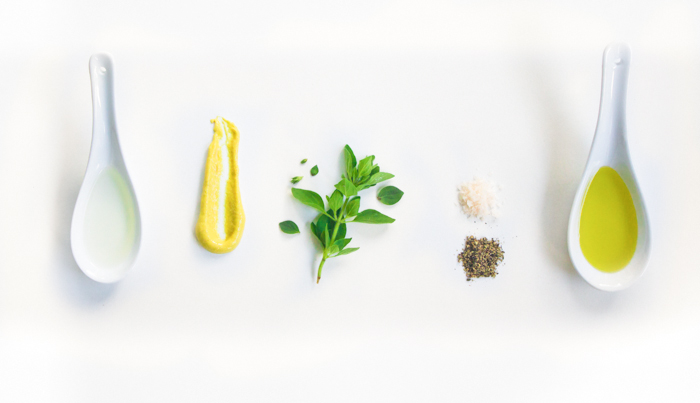
As a follow-up to my previous post about all things salad dressings, here is a recipe for another rock-star of a vinaigrette, following the same formula: 1 part acid + 3 parts oil + seasonings and flavoring ingredients.
This is dynamite tossed with fresh blanched local beans, perhaps adding soba noodles for downright craveable homemade sesame noodles. But it is also wonderful as a marinade for grilled chicken, beef, or pork, with the acid of the vinegar bringing the added bonus of a great meat tenderizer.  SESAME GINGER VINAIGRETTE RECIPE By Catie Makes approximately ¼ cup Rice Vinegar, 1 TBS Garlic, ½ clove, crushed and finely chopped Fresh Ginger, ½ tsp, grated Toasted Sesame Oil, 3 TBS Salt, to taste Combine the vinegar, garlic and ginger in a bowl, and allow to sit for 10 minutes, to infuse the vinegar with the flavor of the garlic and ginger. Then, while whisking constantly, pour the sesame oil into the bowl in a slow, thin stream. Taste, and adjust salt. Serve as a dressing for a green salad, tossed with cooked vegetables (green beans, broccoli, carrots, sautéed greens) or as a marinade for grilled meats. SESAME GREEN BEANS RECIPE Blanch green beans, by cooking in a pot of boiling, heavily salted, water for a few minutes, until crisp-tender. Immediately remove with a slotted spoon to a bowl of ice water to shock to stop the cooking. Drain and pat dry. Toss with Sesame Ginger Vinaigrette and toasted sesame seeds. Can combine with noodles, like Japanese buckwheat Soba noodles, for a more substantial dish. Top with slivered scallions and toasted sesame seeds. | ||||||||||||||||


 Just about four years ago, Mark Bittman wrote a great piece in the New York Times; A Well-Dressed Salad Wears Only Homemade, and it got me thinkin'. Why did salad dressings feel like such a mystery? Why is there usually a huge amount of grocery store real estate devoted to them? Why are they so darn expensive? A recent peek at dressings in my grocery store upstate, showed even the cheapest dressings at around $2.50 for an 8 oz bottle, jumping to $3.59 a bottle for something just slightly more natural. That's $40-57 a gallon--compare that to something like the price at the pump, and it feels like complete lunacy. The other glaring issue I noticed was that sugar, often in the form of high fructose corn syrup, and WATER, frequently make up two of the first three ingredients. Again, lunacy.  A few weeks ago I did a cooking demonstration at a local harvest festival. Showcasing the gorgeous local produce (supplied by Beaver Dam Brook Farm in Ferndale, NY), I did a brief primer on dressings and vinaigrettes. As I was myself when I first started cooking, many of the audience members at my cooking demos were surprised at how fast and simple it was to make a vinaigrette. And so much less expensive while eliminating chemicals, emulsifiers, and that big dose of unnecessary sugar. It seemed crazy that there we were, at a huge farmers' market, a group of people devoted to buying the freshest, least traveled, produce, and yet were not thinking much about then topping that produce with something that was possibly over a year old (when purchased, not to mention the time it has sat on that narrow shelf on the door of your refrigerator), gooey, syrupy, and most likely swimming with ingredients from a factory and not a farm. A few weeks ago I did a cooking demonstration at a local harvest festival. Showcasing the gorgeous local produce (supplied by Beaver Dam Brook Farm in Ferndale, NY), I did a brief primer on dressings and vinaigrettes. As I was myself when I first started cooking, many of the audience members at my cooking demos were surprised at how fast and simple it was to make a vinaigrette. And so much less expensive while eliminating chemicals, emulsifiers, and that big dose of unnecessary sugar. It seemed crazy that there we were, at a huge farmers' market, a group of people devoted to buying the freshest, least traveled, produce, and yet were not thinking much about then topping that produce with something that was possibly over a year old (when purchased, not to mention the time it has sat on that narrow shelf on the door of your refrigerator), gooey, syrupy, and most likely swimming with ingredients from a factory and not a farm.So here's the basic formula: 1 part acid + about 3 parts oil + seasonings and flavoring agents Put the acid in a bowl with the seasonings and flavoring ingredients, if using. If you have time, allow that to sit for 5-10 minutes to better infuse the vinegar. Then while whisking continually, pour the oil into the acid, in a slow, steady stream. The mixture will begin to come together and emulsify. You can also do the same, a bit quicker, with a fork for a "broken" vinaigrette. Or make things very easy and put it in a blender, instead of a bowl, in the same order, streaming the oil in the top while the blade is going. This works particularly well if adding fruit or vegetables for flavor. Most commonly, extra virgin olive oil is used, but gorgeously flavored hazelnut, walnut, pumpkin seed, and avocado oils are also becoming widely available. The acid can be lemon juice, lime juice, vinegars (balsamic, white or red wine, sherry, rice, cider) or a combination. Season with salt and pepper, and flavor with shallot, garlic, mustard, pureed fruit or juice, honey, pureed roasted vegetables, fresh herbs, dried herbs, or ground spices. One of my favorites is a three-ingredient vinaigrette of lemon juice, sea salt, and hazelnut oil over a green salad with roasted beets. Experiment with some of these combinations: olive oil + white wine vinegar + dijon mustard (just a dab), minced shallots and garlic (a classic) grapeseed oil + rice vinegar + fresh mango (pureed in a blender), season with salt and pepper to taste olive oil + sherry vinegar + roasted red peppers (again season and puree in a blender) walnut oil + white wine vinegar + roasted fennel and roasted garlic olive oil + lime juice + honey and ground cumin or this Roasted Cherry Tomato Vinaigrette, I posted recently. The formula is simple, it's not rocket science, you can hardly go wrong, and the options are so much more rewarding than the same-old same-old you'll find on the dusty eye-level shelf at your store. Do yourself a huge favor, work this into your life. Experiment, taste, and experiment some more. Tonight. | ||||||||||||||||


 Our 52 heirloom tomato plants are in their final days, but have heroically yielded hundreds of pounds of beautiful fruit this year. A very triumphant relief, following the yield of six (yes, just six) tomatoes we got from the same number of plants last summer in the throws of the huge tomato blight. We are still managing to gather buckets of red, orange, and golden cherry tomatoes almost daily, though are even a little tomatoed-out after weeks and weeks of eating nothing but. This roasted tomato vinaigrette is one of our favorites, and so much so it was served over sliced local tomatoes at our wedding three Augusts ago, and printed on the back of the menu. As the weather gets cooler, and I automatically start to crave autumn foods, this hanger-on recipe from summer works beautifully over sauteed hearty greens, the last of the zucchini and summer squash, grilled pork, chicken or fish, as a tangy base for a stew, as well as a dressing for a simple green salad. I also love to can a few pints of it in our pressure canner to wake up meals, or dip crusty bread in, in the dreary days of winter.
 | ||||||||||||||||||||||


 This past weekend friends who live near us upstate, on an area overrun with ramps, graciously invited us over for our second annual swap of all-we-can-pick ramps for a pick-up truck full of our "like gold" sheep manure for their garden. (So very cutting-edge-hipster-locavore. Then again, poop for weeds...) After a very muddy morning, we brought home two substantial garbage bags of ramps with their roots and soil intact, to transplant to our woods, and a very generous shopping bag of loose ramps to cook and eat. I got to work on a big batch of these slightly hot, slightly sweet, bright and tangy pickled ramps that night. I am now addicted, and looking forward to ice cold pickled ramp martinis later this summer. Oh, and picked ramps also go brilliantly with fish and roasted meats, on sandwiches, or alongside cheeses and charcuterie.
 | ||||||||||||||||||||||


 Lately we have been getting the most wonderful fresh milk from Dirie's Farm, a small family-owned dairy farm near us. The milk has a whole melody of flavor, that clearly illustrates what people are talking about when they refer to the terroir in wine. You can taste this area. You can taste the differences in the seasons, and the grassy fields and hay on which these cows are feeding. A few months ago I had an impromptu lunch out by myself (I mean, with my date, New York Magazine) at Veloce Pizzeria in the East Village of NYC. They have a divine ricotta crostini "spuntini" (Italian snacks). Superb rich ricotta slathered on crusty toasted bread with fresh black pepper. Heaven. So craving that, this week's farm milk became glorious ricotta. It's easy, easy, easy. There are many recipes out there, using several different acidifying agents (vinegar, lemon juice, buttermilk, and citric acid). I learned this from my culinary school, and Ricki the Cheese Queen, both using the exact same method with citric acid, so I'll stick with that. Citric Acid is pretty widely available. It is often called for in canning tomatoes. I have seen it in my grocery store near canning supplies or products like Fruit Fresh. But you can also easily get it here, from the wonderful New England Cheesemaking Supply Company.
  | ||||||||||||||||||||||


|
{ welcome! }
 Catie Baumer Schwalb is a chef, food writer and photographer, who splits her life between the city and the country. Not too long ago Catie was a New York City based actress and playwright for more than a decade. She has her Master of Fine Arts from the National Theater Conservatory, and her Grand Diplôme in classic culinary arts from the French Culinary Institute in New York City.
... Read More ≫
Catie Baumer Schwalb is a chef, food writer and photographer, who splits her life between the city and the country. Not too long ago Catie was a New York City based actress and playwright for more than a decade. She has her Master of Fine Arts from the National Theater Conservatory, and her Grand Diplôme in classic culinary arts from the French Culinary Institute in New York City.
... Read More ≫{ get in touch }
{ what's new }
September 12, 2015
August 19, 2013
August 15, 2013
August 13, 2013
August 1, 2013
{ favorites }
{ archives }
Appetizers / Breads & Pastry / Breakfast / Cakes / Canning / Condiments / Dinner / DIY foods / Drinks / Fall / favorites / Grains / Holidays / Local / Noodles & Pasta / Pies & Tarts / Poultry / Salads / Seafood / Snacks / Soup / Spring / Summer / Sweets / Techniques / Vegetables / Vegetarian / Winter /
{ currently reading }
|


