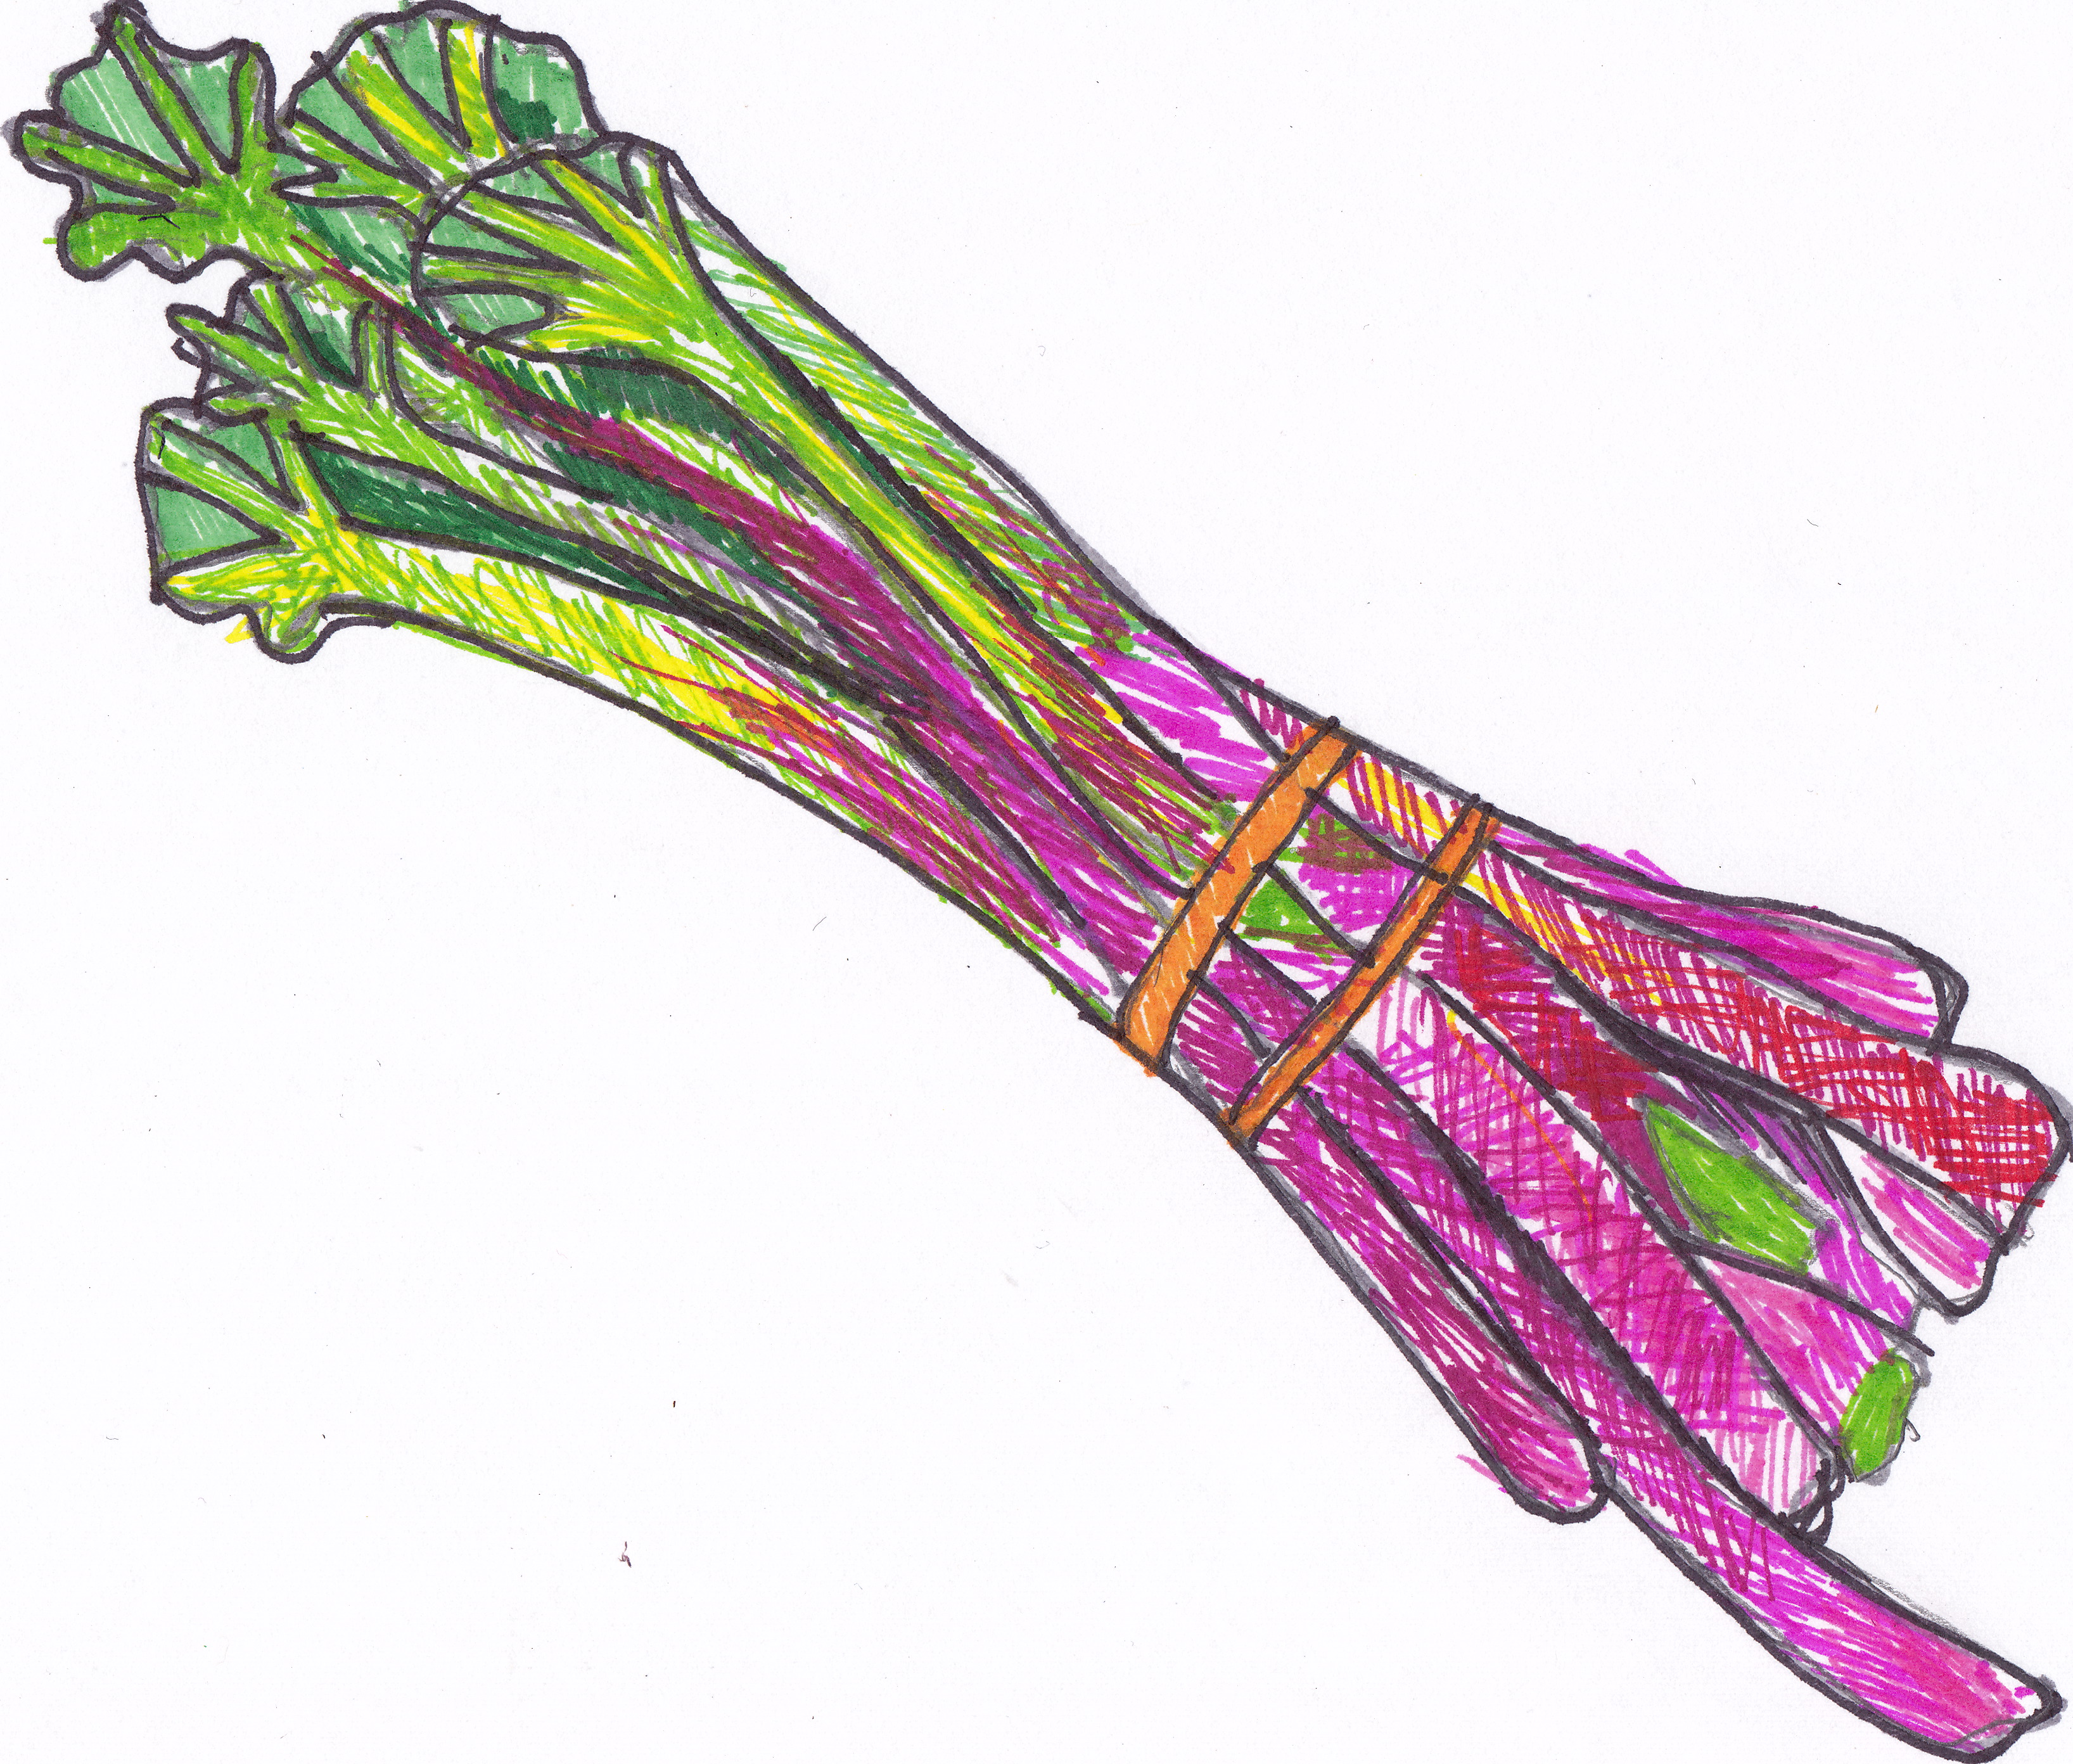
I love rhubarb. I love it for it's old fashioned vibe. I love it for it's color, striking tartness, and even for it's moderate shelf life. I also love it for showing up so darn early in the spring and sticking around for several months. And I too was at first intimidated by those long, irregular-shaped, tough magenta stalks at the market. I actually overheard a conversation at our market up here recently, where a woman who had just bought a weekend house near the Delaware discovered she had huge decades-old rhubarb plants growing on her property. However she didn't know when it was time to pick them. Nor did the young woman working the farm stand, so I jumped in with what I knew. She had been waiting for them to turn red, ripen, to pick. I explained that some heirloom varieties, have very little red, and the stalks can range from thin to the thicker more uniform we're used to seeing in grocery stores. I generally go by feel, but you can harvest stalks when between ten and fifteen inches long, avoiding letting them go too long and become tough, dry or woody. Once you get your rhubarb back you your kitchen, from yard or market, they really are one of the most simple fruit to prepare. Make sure all traces of the leaves are trimmed off, as they are not edible. Rhubarb have a bad rap for being stringy, as in celery stringy, but as long as they are cut in small pieces before cooked, the strings will not be a nuisance. For good measure, or habit, I tend to peel two or three strings off each stalk, from end to end, but not too much, as you are also peeling off any of the great magenta color. Wash the stalks well and then cut into slices between an half inch and an inch thick. You can then roast the pieces, throw them in to brighten up a rich stew, or as I do most often, simmer them down to a quick rhubarb puree or sauce. Pack the rhubarb into a sauce pan or small pot that holds the pieces sort of snugly. Add enough water to come up about 3/4 of the way up the sides of the slices, and simmer over a medium-low heat, until the rhubarb has broken down and is tender. Add more water if the mixture seems to be getting to dry or risking burning at all. When finished you can mash it up a little to have a sauce with more texture, or use a food processor, blender or immersion blender to give you smoother final product. If you are looking to use the sauce as a topping by itself, add about a tablespoon of sugar per large stalk of rhubarb when simmering down, or another classic way to cut rhubarb's intense sourness is to add at least 1 part strawberries for every 3 parts rhubarb when starting the sauce. Taste when finished and adjust sweetness if necessary. Vanilla beans, ginger, orange, cinnamon, almost all berries and apples are all great additions as well. Make a big batch. Eat it warm or ice cold. Spoon it over ice cream, blend it into cream cheese, swirl it in yogurt or oatmeal, drizzle it over a wedge of Stilton or duck or game meats, whisk it into your vinaigrette, blend it with ice for your margarita. Really, what other fruit, the northeast no less, is quite so versatile? | ||||||||||||||||


This frenchy-french-french tart has the lusciousness of fall written all over it. Spectacular for breakfast, brunch, lunch or dinner, it is also glorious with a crisp green salad. And it freezes really well. So with it almost taking as much work to make one as to make two, do just that and stock yourself with a fast food gift in your freezer for some bleak mid-winter eve. This can of course be made vegetarian, and equally good, by omitting the bacon, and substituting two tablespoons of butter, for the bacon fat, for sauteing the leeks. Leek Bacon and Gruyere Tart by Catie Schwalb makes one 9" tart. (more…) | ||||||||||||||||


 This is a peach pie my grandmother has made for years. I adore the visual of the entire peach halves, that always elicits at least one gasp of admiration when set down on the table. With peaches stunningly sweet this time in the season, I also really appreciate the addition of the custard-like filling, instead of the usual toss with cinnamon and sugar. Though it does contain sugar, the custard-souffle-y filling really compliments the fruit and cuts the sweetness some. This pie is also really beautiful, and really delicious, with blueberries tucked into the spaces and cavities in and around the peaches. Summer overload in a crust. I haven't tried it, but I imagine raspberries wouldn't be awful either.
 | ||||||||||||||||||||||


So here is another recipe handed down from Catherine the Great. No, not the Empress of Russia, but my maternal grandmother--one of my first cooking influences, and for whom I am named. I make this pie at least once a year. I can't keep myself from it as soon as I see quarts of local strawberries showing up on the tables at the farmers' markets. It is simple as pie (pun intended). A great buttery crust, plump, fresh, raw strawberries, and a quick jammy glaze. Fruit and high quality carbs: two tastes that should always go together. It is reminiscent of toast and jam, strawberry short cake, or dare I say...pop tart? Since the ingredients are so sparse, the quality of the products you use is paramount. Make a wonderful, flaky, homemade pie crust, use a golden farm-fresh egg and great butter, and above all, use amazing strawberries at the height of their season. It just won't be that great otherwise. Also, because the strawberry flavor can vary a lot from sour to sweet, start slowly with the sugar and the lemon juice in the glaze, and adjust as necessary depending on the flavor of the strawberries you are using. (more…) | ||||||||||||||||


 As hinted at earlier this week, asparagus is bustin' out all over on our micro-farm. One of the very first signs of a long season of fresh food from the gardens, this perennial faithfully returns each May, basically without us having to do a thing. (That's my kind of garden vegetable!) Since it is never better than right now, we'll eat just-picked asparagus almost every night for dinner for the next several weeks. Then finally, when we can't stand it anymore, which fortunately is right about when the asparagus season peters out, we'll put our asparagus habit to bed for another 11 months. Once you've had it this fresh and this good, you are spoiled for anything trying to masquerade as asparagus in the rest of the year. But it is a challenge to keep it interesting in the dinners ahead. Even as good as it is, when having asparagus almost nightly, sauteing, grilling, and soup-ing gets old quickly. This savory galette was a very welcomed change, and was gobbled up quickly last evening. It would also be wonderful for brunch, or cut in small squares for late spring hors d'oeuvres. I have been on a galette with corners kick this year, but feel free to form it in the more traditional round shape, or any free-form shape that works for you and your stalks.
| ||||||||||||||||||||||


 Soon after I finished culinary school a wise and wonderful chef and cookbook author asked me, as I was first meeting her, what kind of food do you cook? I was a little stumped. I was just out of a year of cooking little other than classical french cuisine. And a year of cooking predetermined recipes that I had to master, in order to learn said classical french cuisine. Eating locally, and seasonally, and knowing where my ingredients come from are always paramount when I cook, but beyond "farm to table", I didn't really have a ready response as far as my personal style with food. But after some introspection, I think at least one of my approaches to cooking, though perhaps somewhat obvious, is to get the finest possible ingredients, at the height of their season or freshness, from the best possible sources, and then: get out of their way. Or compliment their strengths that are already therein, rather than transforming or imposing. At least that's the goal. How can I possibly improve upon a homegrown, just-picked Jaune Flamme heirloom tomato, drizzled with exceptional olive oil This recipe does just that. Blood oranges are in season right now, and at the height of their glorious flavor. They are a stunning deep garnet color, with a taste that ranges from orange to raspberry to grape. A phenomenal homemade pastry crust, along with the roasted fruit, this galette reminds me a lot of my great grandmother's jam-filled thumbprint cookies, or a very sophisticated Pop-Tart. And brings some necessary brightness to a dull week of winter. (more…) | ||||||||||||||||


Bleached flour, partially hydrogenated lard with BHA and BHT, wheat starch, water, xanthan gum, potassium sorbate and sodium propionate (preservatives), Yellow 5, and Red 40.
Butter, Flour, Salt, Water, and sometimes an egg. The first is a list of just some of the ingredients of a popular, store-bought, ready-to-unroll, pie crust. The second is what comprises a homemade, you-are-looney-not-to-make-yourself, pie crust. I remember taking a homemade pie, with a homemade pie crust to a friend's house a few years back. When someone raved about the crust and asked what brand it was, I told them I had made it myself. They were shocked, and I was shocked that they were shocked. They then responded that "it must be nice to have the time to make your own pie crusts"... Well, I'm here to tell you, my friends, that you can have these made in about the time it takes you to defrost your hydrogenated lard sheets of dough, and your golden color will come from creamy butter and perhaps a farm fresh egg yolk, instead of Yellow numero 5. And let's just chat about cost for a brief moment. At a recent glance, store bought refrigerated or frozen pie crusts ranged from $3.79 to $4.99 for a two crust package. Making it at home will run you about $2. Are you with me people? But isn't it really tough? Only if you over work it. (gluten humor.) No! But there are a couple of things to be aware of that will help you achieve buttery flaky pastry nirvana, and avoid a gravelly, leaden disappointment. Gluten! This small word (from the latin word for glue) is getting an enormous amount of air-time these days. Gluten is a substance found in certain grains and flours, most commonly wheat, that when mixed with moisture is activated to create a sticky, bonding compound which makes great bagels so chewy, or lousy pastries dense doorstops. The stronger the gluten bond, the less flaky and light the crust will be. Fats, sugar, or acids inhibit the formation of a strong gluten structure. However, the more you knead, play with, or "work" a dough, the more developed the gluten bonds will be. So when working with a dough, you want to handle it as little as possible. Don't leave the food processor on high and have the ball of dough whipping around the machine. Don't knead it! Just do as much as you have to to get the ingredients to come together, and then hands off. Also, allowing the dough to rest in the refrigerator for a half hour after you've made it, will allow the gluten structure to relax some as well. The recipe below makes two crusts, for one double crusted pie (top and bottom), or two separate single pie shells. If I am going to take the time to get flour about the kitchen, I always make this full recipe, sometimes doubling it for four crusts. Divide and wrap unused dough in two airtight layers of plastic wrap or freezer bags, and they can be frozen for about 3 months. Remove to the refrigerator the day before to thaw. Give this a try. The ease, and more importantly, the taste will astound you. Get this down now and you'll be a crust making-fool in time for peach pie season. BASIC PIE CRUST PASTRY Makes 2 crusts for one double crust pie, or two single pie shells. 3 cups all-purpose unbleached flour 1 teaspoon salt 8 oz (2 sticks) unsalted butter, cubed and chilled (or popped in freezer for 15 minutes after cut into cubes) 1/2 cup water, ice cold OR 2 large eggs with 4 teaspoons of water Step 1: Combine flour and salt in a food processor. Add cubes of chilled butter.  Step 2: Gently pulse food processor, until the butter is the size of small peas. These pieces of fat in the dough will create pockets when it is baked, and result in the flaky texture.  Step 3: Evenly distribute the ice water, or egg and water mixture, and pulse just until the dough comes together in a ball. It may be necessary to add just a bit more moisture, which you can do a tablespoon at a time, again, just until the dough comes together.  Step 4: Pour the dough onto a well-floured surface. In balls about the size of a walnut, gently push and smear the dough out with the heel of your hand, just once each ball. Continue until you have done this with all of the dough. The term for this in french is fraisage. It will help make sure there aren't any giant pieces of unincorporated butter, that will melt and cause a hole in your crust, but will also help create long layers of butter in your dough, that will ideally help with the flakiness.  Step 5: When all of the dough has been fraisage-d, form into two disks, that are generally flat and round. This will help give you a head start on the shape you are trying to achieve when it comes time to roll it out. Wrap individually in plastic, and place in the refrigerator for a half hour to rest. You can also freeze the disks of dough at this point.  Step 6: Remove the dough disk from the refrigerator and place on a gently floured surface. It might need a minute or two to come up just a bit in temperature, so it doesn't crack all over when you put a rolling pin to it. Gently press down with a rolling pin, and apply light pressure, at first, as you roll forward. Continue to roll forward only, turning the dough as you need, until you have a circle about an inch wider on all sides than the pie plate you are using.  Step 7: Brush excess flour off the top surface of the dough. To transport the rolled out dough to a pie plate, gently roll the dough around the rolling pin, brushing off excess flour on the bottom, as you go.  Step 8: Bring the dough-wrapped rolling in to your baking dish, and unroll in the opposite direction.  Step 9: Loosely fit the dough into the shell, using a small ball of spare dough to push it gently into the corners, if needed. Trim any large overhanging edges, leaving about a 1/2 inch on all sides. With your thumb and pointer finger on one hand, and the tip of your thumb on the other, go around the top of the edge, pinching your two hands together every inch or so, to create a fluted edge to your crust.  Step 10: Return pie shell to the refrigerator to chill slightly before baking, or filling and baking. Voila! | ||||||||||||||||


|
{ welcome! }
 Catie Baumer Schwalb is a chef, food writer and photographer, who splits her life between the city and the country. Not too long ago Catie was a New York City based actress and playwright for more than a decade. She has her Master of Fine Arts from the National Theater Conservatory, and her Grand Diplôme in classic culinary arts from the French Culinary Institute in New York City.
... Read More ≫
Catie Baumer Schwalb is a chef, food writer and photographer, who splits her life between the city and the country. Not too long ago Catie was a New York City based actress and playwright for more than a decade. She has her Master of Fine Arts from the National Theater Conservatory, and her Grand Diplôme in classic culinary arts from the French Culinary Institute in New York City.
... Read More ≫{ get in touch }
{ what's new }
September 12, 2015
August 19, 2013
August 15, 2013
August 13, 2013
August 1, 2013
{ favorites }
{ archives }
Appetizers / Breads & Pastry / Breakfast / Cakes / Canning / Condiments / Dinner / DIY foods / Drinks / Fall / favorites / Grains / Holidays / Local / Noodles & Pasta / Pies & Tarts / Poultry / Salads / Seafood / Snacks / Soup / Spring / Summer / Sweets / Techniques / Vegetables / Vegetarian / Winter /
{ currently reading }
|


