Never had one of these in my life until I had a kid. Should have had one decades earlier. (this is the one I own. A friend recently captioned a photo on facebook of the same one, titling it "Ziggy Starbrush") My bottle brush sits in our dish rack right next to the sink. It is there to, as stated, wash baby bottles. But over the past 21 months, I have found myself reaching for it again and again for lots of hard-to-scrub objects that were once dreaded chores.
These really should be marketed farer and wider than baby registry check-lists. Any other brilliant uses you've come across? Let me know in the comments. | ||||||||||||||||


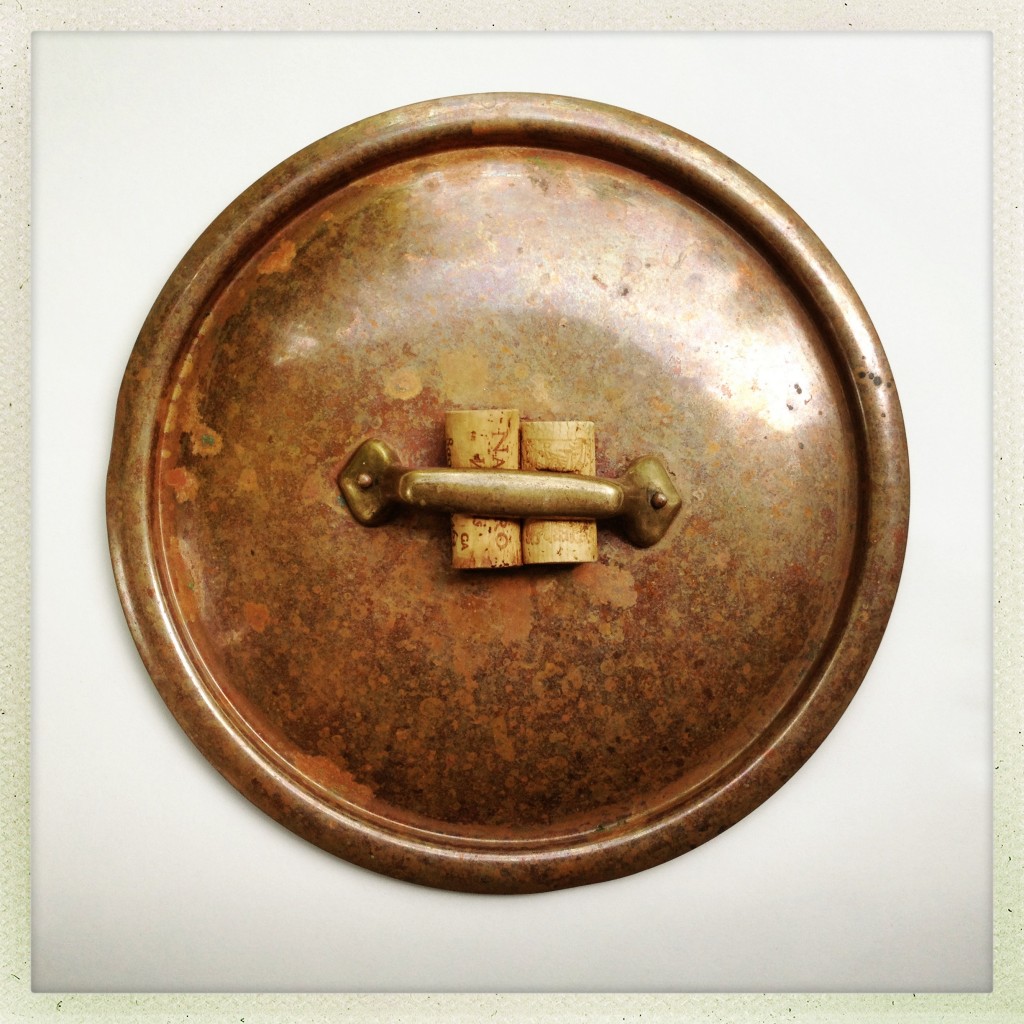
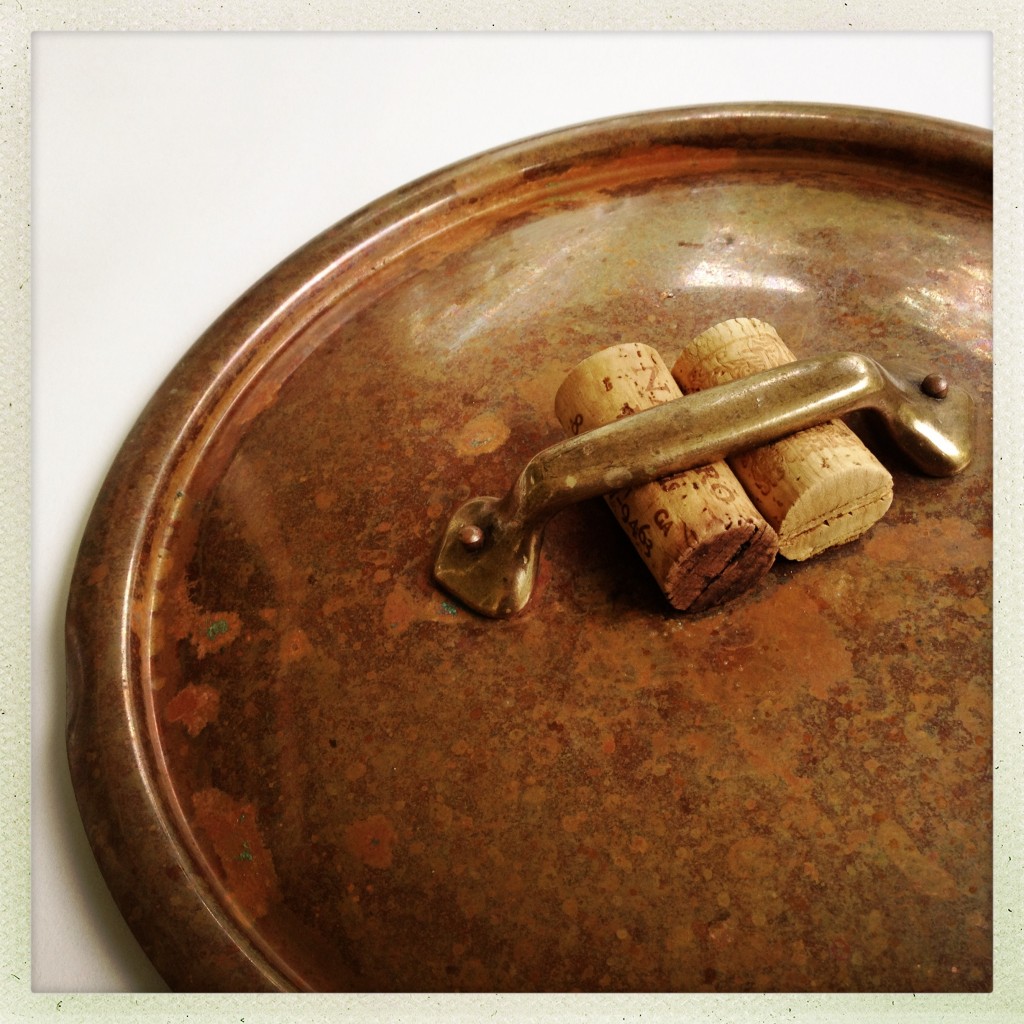
Most of our cookware have lids that are completely constructed of metal of some variety. Especially the copper pieces. They are my favorite to cook with, stellar conductors of heat, but OUCH if you grab the lid without thinking. Above is the lid from our prized giant stock pot that forever sits on our stovetop, as it is so darn pretty. A few years ago we were at a friend's for dinner who had the same one, and spotted this genius solution for the scalding handle or the annoyance of constantly searching for a pot holder. Jam two corks from previously enjoyed wine bottles (we happened to be able to dig up a few), under the handle and problem solved. The corks don't conduct any of the heat, and they even stay put through (hand) washing.
| ||||||||||||||||


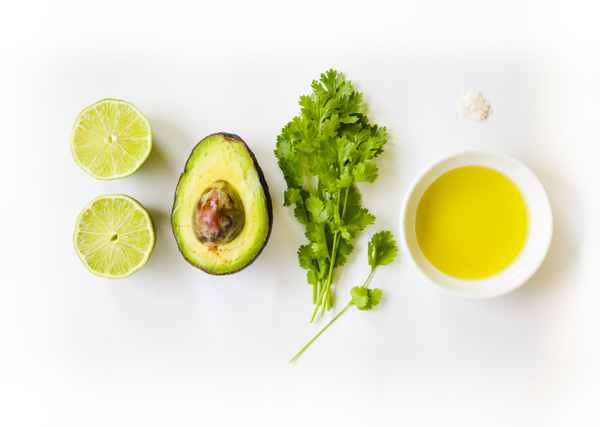
I made this quickly in the blender this week, to go over a cold rice salad with shredded poached chicken, local corn, a few early tomatoes and chunks of avocado. Mostly the goal was to distribute the little bit of avocado I had on hand as much as possible throughout the salad. We loved the result, and I expect we'll be drizzling this all over salads, soups, sandwiches, and all sorts of grilled things all summer long. Creamy Avocado Lime and Cilantro Dressing By Catie Baumer Schwalb makes about one cup. 1/2 avocado 3 tablespoons fresh lime juice, from one large lime, or a few smaller 1/4 cup, packed, fresh cilantro (include stems too if they are young and fresh) 1/2-3/4 cup olive oil salt, to taste In a blender, combine avocado, lime juice and cilantro. Blend until smooth. Through the hole in the blender lid, slowly pour in the olive oil, with the blender on low. Start with a half cup, and taste for balance. If it seems too tart, add a little more gradually, tasting as you go. Season with salt, to taste. Serve immediately, or chill briefly. | ||||||||||||||||


 I get a lot of "cooking SOS!" text, emails and calls from friends and relatives. I guess it goes along with my culinary Le Grand Diplôme. But, I love it and often learn something myself. Recently a friend complained that her pumpkin pie was taking much longer to bake, and fully set in the middle, than the recipe had stated. After hearing that she hadn't substituted any ingredients, had used the suggested sized baking pan, and hadn't doubled the recipe, I suspected the culprit could be the oven temperature. We turn the oven dial to the temperature we want, wait for it to heat up, and assume that the oven is precisely calibrated and spot on with it's temperature. Even if it is a 20+ year old appliance. Sort of a big gamble, when you are trying for a specific target finished temperature, or delicate baking results. In culinary school each of our ovens at our stations in the classroom had an oven thermometer Oven thermometers  | ||||||||||||||||


 April 1st. The "I think I can, I think I can..." continues. I think I can make it to the end of this relentless Catskill's winter. Right now, even as I type this, one day after we were admiring deep purple crocuses at my mother's for Easter, there are wide swirls of snow flurries mocking me outside the windows over my desk. But the garden seeds have been ordered. Seedlings will be started shortly. And our neon pink rhubarb stalks have just broken through the cold muddy ground. And chives. And oregano. Maybe ramps next. In the meantime, while I am fantasizing about warm weather cooking, getting to take daily advantage of vibrant fresh produce, with their bright colors and refreshing textures, I'm tucking away some other favorite produce, soon to be gone until the late fall. (more…) | ||||||||||||||||


Full disclosure: in season or not, I use a lot of scallions. I love their subtle oniony vibe, pop of color, and exotic feel. I love their tubey shape and making thin cuts on an extreme angle for geometric garnishes. I love that they are equally useable raw or cooked. I LOVE them in my Homemade Scallion Pancakes and David Chang's Scallion Ginger Sauce from his Momofuku cookbook. So, each summer I faithfully devote an entire garden bed to growing my own scallions. And each year it is wildly unsuccessful. The seeds are microscopic, making it insanely difficult to evenly distribute them in the ground. When they do start to sprout up, in awkward clusters, they are the tiniest green threads, impossible to see and differentiate from the weeks that are intent on choking them out. But every year, I try, try again. So, cut to me on the subway a couple of weeks ago, overhearing a conversation between two adorable twenty-something hipsters, waxing poetic about the treasures on pinterest. Now I have not really explored pinterest, other than to see some referring pages that have come into my blog. And I have some mixed feelings about it from first glance. However, what I heard the DIYers going on and on about was the "growing scallions thing" on pinterest. Ok, I was curious and googled as soon as I got above ground. Apparently the scallion thing that has swept across the pinterestsphere, is the lesson that you can regenerate whole, perfectly edible scallions from the bottom tips that are usually cut off and tossed away. Yep. And I tried it. And yep. It works! Just place the root ends of scallions upright in about an inch of water and put in a sunny spot. In twenty four hours you will see some growth, and in just under a week they'll be full grown again. The only upkeep is to change the water every other day or so, which also helps cut down on any oniony smell. You can repeat the process three or four times with the same scallion tip. So excited to have a much more successful way of growing my own. And thrilled to add another vegetable to my eating local list--all year round. My apologies to the national scallion growers council.  | ||||||||||||||||


 Not just for summer fetes on the beach, clams and other bivalves are a spectacular, and traditional, addition to the holiday table, and perhaps even more importantly, the holiday cocktail hour. A few critical steps can help insure a grit-free mouthful, and will dramatically reduce your chances of getting that one bad clam. Buying Buying the freshest seafood you can get is always the most important place to start, and the best way to help with this is to get to know the people at the seafood counter. If picking them out yourself, look for clams that are not chipped, cracked, or have a damaged shell in anyway. If buying them already bundled, discard any that are broken. Always buy a few more than you need in case of broken shells or clams that don’t open. Storing Store clams in a bowl in the refrigerator covered with a damp cloth. They can keep for a day or two, but the sooner you use them the better for all. Cleaning The day you want to cook them again go through all of the clams and discard any that have a damaged shell. (when in doubt…throw it out.). Scrub the outside of each shell thoroughly to remove any dirt. As you are going through, one by one, if you find a clam that is open, gently tap it on the counter. If it doesn’t close within a minute or two, it is dead and should be thrown out. This is a critical step, as it will look like all the others that have also opened, after they all cook, and yet could potentially make you sick. Any that are dead at the start need to go. Place all of the scrubbed clams in a large bowl, or the sink, and cover with cold water by an inch or two. Allow the clams to sit for twenty minutes in the water. The clams will spit out any grit they have inside their shell. Don’t leave them in the water for much longer than twenty minutes, or they will die. Remove the clams gently, by hand, from the bowl, leaving the dirt and sand behind at the bottom. Pouring them into a colander or scooping them out abruptly could stir up the grit and get it back in the shells. Cook as desired (more on this later this week.). And discard any clams that have not opened during the cooking process.  | ||||||||||||||||


 Dame Paula Deen, amid mass fan hysteria (hysteria!), posing next to a pumpkin of her likeness (and Cat Cora's) at the Food Network festival at Chelsea Market a few years back. We were completely unsuspecting shoppers, caught, literally, in the swell. (Not unlike that terrified-looking couple coming out of the fish market behind her.) I am as big a fan of pumpkin carving and jack-o-lanterns as anyone, and definitely considered finally having a porch to put one on, one of the bigger perks of moving out of NYC. But I am equally as big a fan of pumpkins themselves, pumpkin seeds, pumpkin flesh, pumpkin vines, all of it. This time of year it is easy just to see said pumpkins as holiday flare. But particularly with tons (and tons!) of them at the markets right now, it is time to stock up and revel in all things orange and round. Seed Saving | ||||||||||||||||


[caption id="attachment_3026" align="aligncenter" width="640"]  http://www.pitchforkdiaries.com/2011/10/18/technique-tues…o-clean-a-leek/[/caption] http://www.pitchforkdiaries.com/2011/10/18/technique-tues…o-clean-a-leek/[/caption]Giant Musselburgh leeks from our garden. Though the few nights of just dipping down to a frost have demolished most of the delicate summer produce in our gardens, this time of year signals that our leeks are starting to reach their sweetest. Cousins of the onion, leeks too are many-layered, and because almost half of the plant grows underground, they have practically spoonfuls of dirt trapped in said layers. Cleaning them, to avoid an off-putting little bite of grit in your meal, is critical and a bit of a trick. However, it is also super simple and well worth the time for the reward of this gorgeous flavor-bomb available long into the winter. HOW TO CLEAN A LEEK | ||||||||||||||||


 Glorious cobs of corn will still be around at the farmers' markets for a couple of weeks. Sweet, meltingly tender, golden or pearly white, they are never better (or cheaper) than right now. We eat it with dinner nearly every night for the month when it is at it's best, just barely cooking it, as it doesn't need much more, and then say farewell for another eleven months. However, we also religiously freeze corn to use in meals in the months ahead. Pulling out and defrosting a bag of farmer's market kernels feels so luxurious in the depths of winter--not to mention a tremendous vitamin-packed time and money saver. Great for chowders, soups and chili, I'll also combine the corn with my frozen peppers for a tex-mex-y topper for eggs, or a perfect start for fajitas and burritos. Slowly saute some onions along with them, and add a little cumin, chili powder, ground corriander, and epazote for a colorful, sweet, base for a meal. Glorious cobs of corn will still be around at the farmers' markets for a couple of weeks. Sweet, meltingly tender, golden or pearly white, they are never better (or cheaper) than right now. We eat it with dinner nearly every night for the month when it is at it's best, just barely cooking it, as it doesn't need much more, and then say farewell for another eleven months. However, we also religiously freeze corn to use in meals in the months ahead. Pulling out and defrosting a bag of farmer's market kernels feels so luxurious in the depths of winter--not to mention a tremendous vitamin-packed time and money saver. Great for chowders, soups and chili, I'll also combine the corn with my frozen peppers for a tex-mex-y topper for eggs, or a perfect start for fajitas and burritos. Slowly saute some onions along with them, and add a little cumin, chili powder, ground corriander, and epazote for a colorful, sweet, base for a meal.How to Freeze Corn (more…) | ||||||||||||||||


 This may be the garnish to end all garnishes. I remember so vividly the day we learned this in culinary school, and how I raced home to try it myself, feeling like I had just unlocked some illusive five star chef secret. This simple little technique gives you magnificent, fragrant green gold to drizzle about a plate, swirl atop a bowl of soup (it floats!), and dunk very lucky crusty bread in. Seriously, this just smeared on a white plate, and you look like a superstar. Regular ol' oil becomes glistening emerald and is all things basil...or parsley or cilantro--it works for a variety of herbs. I made a thai basil-cilantro oil to drizzle around a Thai-spiced quail dish that worked beautifully. The oil will keep for about a week in the refrigerator. I've also frozen it in ice cube trays to defrost later in the year, to swirl on top of a creamy soup, or drizzle along side some roasted salmon. But try this now, even to just dress up some sliced tomatoes. There. Is. Nothing. Better.
| ||||||||||||||||||||||


 Peaches and other stone fruit are perfect and plentiful (and pretty cheap!) at the markets right now. Taking an hour or so and freezing a bunch will be total treasure in your freezer come winter. And...far extend your season for making David Lebovitz's ridiculously good peach ice cream (it contains sour cream, people! Sour cream!!). Here are a couple of quick, and a little easier, tips for puttin' up the peach. Blanching (to remove the skin). Nothing new or revolutionary, but the quickest way to remove the skin, and really idiot-proof. You'll be thankful later on that the skins are gone, so you can just pop those frozen slices of sunshine virtually from the freezer to your blender for a smoothie or to a pie shell (give or take a little thawing.) Method: 1. Bring a large pot of water to a boil. Wash whole peaches. Don't bother to dry. 2. Cut a small "X" in the bottom of the peach with a sharp knife, just cutting through the skin. This will give the skin a place to start to slip-off when blanched. 3. Slowly lower peaches, several at a time depending on the size of your pot, into the boiling water. 4. Remove peaches from the boiling water after one minute with a slotted spoon. Immediately transfer the peaches to either a large bowl of ice water, or a colander and run under very cold water. 5. Starting where you made the "X" on the bottom, just literally slip the skin off the peach with your hands. It will come off very very easily. Freezing To extend the life of your frozen peaches, and ward off freezer burn, you want as little air in the container with the frozen fruit (and vegetables too) as possible. Sucking air out of a freezer bag with a straw, and then trying to zip-lock-it as quickly as possible was my method of choice for years. But this method below, using water to displace the air, has worked much better, and much quicker, for me in recent seasons. 1. Fill a large bowl with water, leaving some room at the top. 2. Lower a freezer-safe bag, filled with whatever you are freezing, into the bowl, with the top of the bag still partially open, with room for air to escape.  3. As you lower the bag further into the bowl, the water will surround the shape of the bag, and press out a good amount of air. Continue to lower the bag, until the level of the water is as close to the top of the bag as you can go, without risking getting water in with the fruit. Seal bag immediately and remove from bowl. 4. Gently press on the fruit in the bag to redistribute and make it flatter for storage in the freezer. Label and freeze. Peaches will keep for about six months in the freezer. Peach pie in February anyone? To preserve the color a little better, you can add a little citric acid  | ||||||||||||||||


 By this point in the summer I definitely get into a rut and prepare fruit and vegetables from the gardens and market in almost the same ways daily. Not that that is a bad thing, as with produce this amazing, at the height of their season, there is often very little that can improve upon them. A little grilling here, a little lightly dressed salad there, a little sautéing tossed with fresh pasta over there… Vegetable and fruit roasting feels like almost too basic a technique to even justify a whole blog post. However, several times during the year I have these ah-ha moments where I am bored with what I have been cooking and then suddenly remember to mix things up I just need to roast, which I somehow forget about for spells at a time. The long exposure to dry heat and the contact with the surface of a baking sheet or roasting pan transforms produce in ways very different than grilling, steaming or sautéing. Most importantly it evaporates much of the water in the fruit or vegetable, drying it out some (Take that watery zucchini!), and deeply concentrating the flesh and the flavor. Also the edges of the produce start to get brown and sweet and caramelized and utterly irresistible after the natural sugars are exposed to heat and the surface of the baking dish. (more…) | ||||||||||||||||


Remember those old lady knickknacks of the late 70s of a flower completely frozen in a globe of lucite? There were a few geriatric abodes I visited during that era, and those stopped-in-their-tracks flowers were always a fascination. So perfect and yet so bizarrely frozen. You can make your own, a bit more ephemeral, version as another gorgeous use for edible flowers. Encase your posies in ice cubes to chic up late summer cocktails or mocktails. You can use any edible flowers for this project. The flower doesn’t impart all that much flavor to the cube or drink when simply frozen or floating, so it is possible to just focus on color. However, if you think they’ll be eaten, or floating around for a while after they’ve thawed, there are a few pairing ideas below. This is a super quick, nearly effortless way to bring some garden to your cocktail hour. I think it would also be a stunning addition to the season’s bridal and baby showers. Ring-a-round the spritzer, a pocket full of on the rocks. Directions: 1. Wash your flowers gently and carefully, making sure to get rid of any unsuspecting bugs so you don’t accidentally go all fossilized wooly-mammoth on your guests. Tiny, perfect flowers can be frozen whole, but large, somewhat less perfect blossoms, can be torn for an equally pretty effect. 2. In an ice cube tray, pour the slightest amount of water to just cover the bottom (which will be the top) surface. Place your flowers in, facing the bottom (so ultimately right-side-up) touching the thin layer of water as much as possible. Remember: The larger the ice cubes, the longer it will take them to melt… 3. Place trays in the freezer, until the first layer is solid. Remove from freezer, and top with a bit more water and another layer of flowers, if desired, or fill completely. 4. Return ice cube trays to the freezer until frozen and ready to use. Unmold and cheers! Ideas for Use: -- Clear drinks work best. This is even a great way to doll-up a simple glass of seltzer. -- Use flowers from mint, lemon verbena, chamomile, lemon balm, lavender, and even thyme for lemonade. -- Try mint, leaves and flowers, in ice cubes for mojitos -Try thai basil blossoms in ice cubes for thai basil mojitos. -Mint, chamomile, apple blossoms, rose petals and rose hips would be delish in iced tea. -Elderflowers or cucumbery Borage in a gin and tonic on a summer evening. Oh my.  | ||||||||||||||||


 These weeks the gardens are bursting with flowers. Not the flower gardens, but the herb and vegetable gardens. Some of the flowers I planned on (nasturtiums and chamomile), some are part of the journey (pole bean blossoms which will become bean pods), and some are a result of me not harvesting fast enough and a bit of the plant going to seed (cilantro, basil, dill, oregano, and radish). I'm a big proponent of using as much of a plant or vegetable as I can. One of my favorite "tip to toe" recipes doing this is Chef Bill Telepan's Beet Greens Pierogi with Mixed Summer Beets and Brown Butter Sauce. I also got much too excited when I learned in a master class in culinary school, with chef Michael Anthony of NYC's Gramercy Tavern, that I could pickle the technicolored chard stems I had been pushing aside and composting for years. It is equally exciting for me to use flowers in dishes. As mentioned, some are planned, some are not, but there is a lot of flavor, and a ton of color and texture there that would otherwise go to waste. They are not just a pretty face--and frequently fetch a premium price at the markets. Certainly make sure you know what you are serving and eating, so as not to go all Arsenic and Old Lace on unsuspecting BBQ guests. But there are so many varieties of edibles around right now, and just a small edition of a few feels very very special. Cleaning and Storage Try to pick the flowers as close to use as possible. Store them, unwashed, wrapped gently in paper towel in the refrigerator, protected in a bowl or open container. Teeny tiny bugs love to hide out in their petals and folds, so examine each blossom carefully. To wash, and to refresh flowers that are a little droopy, plunge the entire blossom in a bowl of cold water for about five minutes, and then allow to dry on a paper towel. After washing, flowers can be floated. right side up, in a bowl of cold water until ready to go onto the plate. Ideas for Use - Salads! Whole or torn, little bursts of blossom color are a magnificent addition to salads. Nasturtiums in particular, leaves and flowers, with a wonderful peppery zing, are a great addition. But also think about the flowers of complimentary herbs like dill, basil, cilantro, and chervil. Then consider adding some of the same herb to the dressing to tie it all together. - Garnish soups by floating a single blossom in the middle of the bowl. This is particularly effective with cold soups, as it won't wilt the flower. Try it with Borage, a beautiful purple flower with a taste very similar to fresh cucumber. - Decorate cakes, cupcakes and pastry with a blossom here and there. Edible flowers definitely each have their own flavor, so stick with the sweeter and more floral plants for this, like chamomile, lavender, and mint. - Tear up some petals and sprinkle them over a plate or platter like confetti right before serving. Or make a tiny micro salad of flowers to top a piece of grilled fish or meat.  A quick snapshot from lunch--Buttermilk with Fuji Apple Dashi, Market Herbs and Flowers, and Pine Nuts at Momofuku Ssäm Bar, NYC. | ||||||||||||||||


 Our herb garden is growing like weeds. Well, truth be told, the weeds are also growing like weeds. But between the weeds are fragrant, mystical herbs, that are spicing up meals and will also shortly be hoarded away in ziplocks in the freezer for less bountiful months. My favorite herb is lemon verbena. It smells like something that should come from a much more tropical locale--even the plant, with its woody stems and slender leaves, looks rainforesty. Rubbing your fingers on one of the leaves, as I do at the start of many days, is an instant antidepressant. Bright, intensely fragrant, with an aroma and flavor that is distinctly the sweeter side of citrus. Too much and it can make a dish taste like bad perfume, in the right amounts it is transporting. My husband's favorite herb is thyme. It definitely stems (pun intended) from his early childhood-rooted love affair with weekly roast chickens. He painstakingly freezes bunch upon bunch of this savory treasure and stuffs several sprigs under the skin of our weekly roast chickens through the year--as well as it being used in our homemade soups and beloved stocks. So this recipe is a love letter to our favorite herbs. Citrus and thyme marry beautifully, fortunately for us, and both herbs are in great abundance now and for the next couple of months in gardens and markets. A not-too-sweet aromatic addition to sodas and cocktails, and a refreshing palate cleanser when spun into a sorbet or scraped into a granita. Try any of the above with a few fresh berries, oh my. (more…) | ||||||||||||||||


 It's soft shell crab season! From mid-May to early September for the east coast, and longer if you are near the gulf coast, we are in the time of year when these sweet, oceany delicacies are popping up practically all over. Soft shell crabs are regular crabs who have outgrown their current hard exoskeleton, and have shed it as most crustaceans do. Within a few hours their new, soft under-skeleton starts to harden if they remain in the ocean's cold water. But if caught during that precious window, the shell is soft enough where the entire animal, shell and all, is tender enough to be consumed. Not only are they plump and sweet and briny, but you get all of that delectable crab goodness without having to deal with cracking and mallets and bits of flying shell. It also allows for pretty cool whole crab presentations. There are a few small bits of the crab that need to be removed (or cleaned or dressed) before cooking and eating. Your fishmonger can generally do this for you, but ideally it should be done right before cooking to maintain maximum freshness. It is just four simple steps, and worth trying yourself. (more…) | ||||||||||||||||


 A huge part of the allure of pungent, earthy, and exotic ramps, is that their season and availability is so fleeting. With only about a month to harvest until their flavor becomes too strong, the annual pilgrimages into the muddy woods for chefs and epicurians has commenced (or early-bird trips to the farmer's markets for the less adventurous, or more wise). But now also begins the search for ways to preserve ramps, to be enjoyed alongside the bounty of summer produce that is just a couple of months out of reach. I am a big fan of pickling ramps (and of pickled ramp martinis). This offers a great way to preserve ramps for months from now, if you can keep them around that long. I have also become smitten with ramp compound butter. Compound butter is nothing more than butter that has been mixed with herbs or seasonings, but the whole is much more exciting than the sum of its parts. It is a great way to add a little unexpected flavor or color to a meal, or to create an instant pain-free sauce for a dish. Now that you've mastered homemade butter, this is a perfect way to compliment your new home-spun delicacy. The flavored butter can be packed into a small ramekin or dish for slathering on warm bread, or rolled into logs, chilled and sliced. Top a hot grilled steak with a slice of ramp butter, and ooh la la. It is also beautiful on grilled fish, vegetables, dolloped on grilled oysters, or stuffed under the skin of a roast chicken. Try it when making scrambled eggs, whipped into mashed potatoes or polenta, or tossed with pasta and some grated pecorino. It will keep for several months in the freezer, giving you lots of opportunities to use ramps with foods that the weather isn't cooperating with just yet. Experiment and enjoy, and be the envy of all your foraging friends when their ramps have long run out.  RAMP COMPOUND BUTTER 1 lb unsalted butter 4-6 ounces ramps, white and green parts, depending on how concentrated you desire the ramp flavor zest of one large lemon salt, to taste Bring butter to room temperature to fully soften. Trim root end and wash ramps thoroughly, making sure to remove all dirt and grit in the layers near the root. Bring a pot of heavily salted water to a boil, and prepare a bowl of water with lots of ice. Blanch ramps in boiling water, for 30 seconds. Remove quickly and shock in the ice water to stop the cooking and preserve the bright green color. Drain and squeeze out as much water as possible. Spread ramps out on paper towel to allow to dry a bit more. Either thinly chop by hand, or mince in a food processor, the white and green parts of the ramps. Add lemon zest and then combine with softened butter. If you want a more uniform, very green, butter, puree it all together in a food processor (as in the photo of the butter above). If you want a more chunky, rustic butter, either fold the butter in by hand or use the paddle attachment of a stand mixer. Add salt, tasting as you go, if you want salted butter. If you think you'll be adding it to foods that are already sufficiently salted, perhaps don't add any or very little just to enhance the ramp flavor slightly. Pack compound butter into ramekins, small dishes, or air-tight containers and store in the refrigerator for about a week. You can also roll the butter into logs, either in parchment, wax paper, or plastic wrap, to be chilled and sliced. The compound butter can also be frozen for up to three months. Thaw in refrigerator overnight before serving. Recipe credit: Catie Schwalb. | ||||||||||||||||


 Ever since the first time I whipped my own fresh whipped cream, I have kept my gaze obcessively glued to it, in dreaded fear of over-whipping and having it turn into butter. The horror! Imagine! And so to this day I anxiously sweat that critical make or break, stiff peak to useless butter, moment. But wait...I can turn cream into butter? Thus making my own butter? And that easily? Well, yes, yes, and yes. I finally gave it a try this week, gleefully letting my mixer plow right through from beautiful lofty whipped cream to deflated heavier looking cream-paste to cheerful little golden globules of butter separating from ivory buttermilk. And all in about ten minutes. The transformation was kind of thrilling, and the result revelatory. A pint of heavy cream yielded about 6.5 ounces of butter and a cup and a half of buttermilk. Pound for pound this is will end up being a bit more costly than store-bought. However, I found the taste superior and just fresher all around, and it didn't have the "natural flavorings" that I just noticed on the ingredient list of my butter package. I cannot wait to try it with the outstanding, abundantly flavorful, local cream from farmers at the markets. There are also plenty of times when I have bought heavy cream for a recipe, or had extra whipped cream left over from a dinner, and wish I had used it to whip up some butter, rather than having it sit in my refrigerator waiting for another recipe to come up. This is a remarkably easy process and tremendously satisfying. Of all of the challenging and technical cooking projects I have attempted it is amazing that I haven't tried this before, as it is most definitely simpler than most. Give it a try. Slip some on the table at your next gathering. "Oh that? I just whipped that up." (more…) | ||||||||||||||||


 Sweet, elegant, rosy, and full of the ocean, homemade lobster stock grabs my attention like little else. Having a few quarts of this on hand in my freezer has allowed me, on more than one occasion, to pull a seafood risotto out of thin air for unexpected dinner guests. I'll repeat that--pull seafood risotto out of thin air. Like last week's tutorial on making chicken stock, I think it is incredibly important to make a point to use every part of an animal and take nothing for granted. Particularly with pricy lobsters, not wasting any of their precious flavor or nutrients seems paramount. The shells and body have loads of luscious lobster essence, and tossing that out feels criminal. (more…) | ||||||||||||||||


Of all of the amazing things I learned in culinary school, by far the most valuable was how to make great stock. I clearly remember the lightbulb moment when it was demonstrated to us. I clearly remember rushing home that weekend with a bag of carrots, celery, and onions, dying to practice it on my own, and proudly showing my husband my new skill. At this point it is totally ingrained in our weekly life. We whip up a pot of stock almost without thinking, whenever we have extra bones or the reserve in the freezer is getting low. Daily we use lovely homemade stock in all areas of cooking, sometimes where you would just add water, adding a huge boost of flavor and protein. It is such a joy to have it always on hand, know exactly what is in it, and have such a superior ingredient. I can't even smell store-bought broth in a can anymore. There. Is. No. Comparison. I also really value that we are using every bit of the animal, right down to its bones, neck and feet. There is incredible flavor and protein in there. But also if that animal is going to die for me to eat it, and I am certainly not going to take that for granted and be wasteful. Do yourself a giant favor and have a few quarts of this on deck in your freezer. Use it to cook rice and grains, reduce it for sauces, throw in shredded vegetables and thin noodles for a quick soup, and hundreds of other applications. I also love sipping a mugful for a mid-afternoon snack.
| ||||||||||||||||||||||


The flavored vodka market appears to have exploded in the past few years. On a recent trip to the spirits shop, there were shelves upon shelves of vodkas in all imaginable flavors. Whipped cream, bacon, and sweet tea were new ones that caught my eye, but not quite my wallet.  Infusing alcohols is an ancient practice. I read recently of a newly translated Mongolian cookbook dating from 1330, that included a recipe for lamb stew infused vodka. When my husband and I were in China for our honeymoon, on several occasions we were offered a nip from a large glass bottle of grain alcohol, which housed several poisonous snakes. The traditional elixir is thought to have medicinal properties, and held a place of honor in most of the homes we visited. I can't comment on its medicinal effects, but when we finally gave in (impressed?), it wasn't awful, though had a slightly slippery feel as it went down my throat. And I didn't die. Infusing alcohols is an ancient practice. I read recently of a newly translated Mongolian cookbook dating from 1330, that included a recipe for lamb stew infused vodka. When my husband and I were in China for our honeymoon, on several occasions we were offered a nip from a large glass bottle of grain alcohol, which housed several poisonous snakes. The traditional elixir is thought to have medicinal properties, and held a place of honor in most of the homes we visited. I can't comment on its medicinal effects, but when we finally gave in (impressed?), it wasn't awful, though had a slightly slippery feel as it went down my throat. And I didn't die.But snakes and bacon aside, infusing your own spirits is a simple and delicious project, and good skill to have at the ready. A couple of months ago I posted a recipe for DIY Vanilla Extract, which included instructions for homemade vanilla vodka. I took my own advice and gave a few of these as holiday hostess gifts, and was the belle of the ball. My very first attempt at home infused alcohols was this beautiful recipe for fresh strawberry aquavit liqueur, from the gorgeous La Cucina Italiana magazine. In both cases I very much appreciated that I was able to use fresh and natural ingredients, that resulted in a far superior flavor, from anything I had tasted from a store. (more…) | ||||||||||||||||


My mother and grandmother, 1951. Just a year ago today I published my first blog post. There have been a bunch of changes over the year (including the name and url), but I am so thrilled where I have landed and am so excited for all that is ahead. In the past twelve months I've published 35+ original recipes, about 15 DIY tutorials, and am just shy of 80 posts--which included a handful of months I needed to be away from my laptop to get our heirloom vegetable micro farm planted, weeded, and thriving. I have finally managed to set up a Pitchfork Diaries facebook fan page, am no longer intimidated by twitter (@pitchforkdiary), and just this past weekend had an incredibly flattering feature on thekitchn.com. A splendid way to start year number two. Thank you so much for all of your invaluable interest and comments. More delicious days to come. Some of my favorite posts from the last year...
| ||||||||||||||||


 As committed to a locavore diet as I am, for sanity's sake, a little citrus is a welcome addition at this seemingly endless point in the winter season. Lemons, oranges, limes, tangerines and just recently, blood oranges, have made their way into salads, dressings, marinades and desserts, and brought some desperately needed sunshine to my own stockpiles of potatoes, squash, and canned vegetables in our cellar. Frequently, when cooking with citrus, the recipe will require the fruit to be Supremed. A supreme of citrus is one of the natural sections that has been cut away from the tougher, and sometimes bitter, membrane. A much lovelier presentation, particularly in salads, it also exposes more of the flesh and juice and allows the ingredients to blend together more fully, without the "outer wrapping" of the chewy membrane. Note: A very sharp pairing knife will help make this process a lot more successful.  (more…) | ||||||||||||||||


|
{ welcome! }
 Catie Baumer Schwalb is a chef, food writer and photographer, who splits her life between the city and the country. Not too long ago Catie was a New York City based actress and playwright for more than a decade. She has her Master of Fine Arts from the National Theater Conservatory, and her Grand Diplôme in classic culinary arts from the French Culinary Institute in New York City.
... Read More ≫
Catie Baumer Schwalb is a chef, food writer and photographer, who splits her life between the city and the country. Not too long ago Catie was a New York City based actress and playwright for more than a decade. She has her Master of Fine Arts from the National Theater Conservatory, and her Grand Diplôme in classic culinary arts from the French Culinary Institute in New York City.
... Read More ≫{ get in touch }
{ what's new }
September 12, 2015
August 19, 2013
August 15, 2013
August 13, 2013
August 1, 2013
{ favorites }
{ archives }
Appetizers / Breads & Pastry / Breakfast / Cakes / Canning / Condiments / Dinner / DIY foods / Drinks / Fall / favorites / Grains / Holidays / Local / Noodles & Pasta / Pies & Tarts / Poultry / Salads / Seafood / Snacks / Soup / Spring / Summer / Sweets / Techniques / Vegetables / Vegetarian / Winter /
{ currently reading }
|


