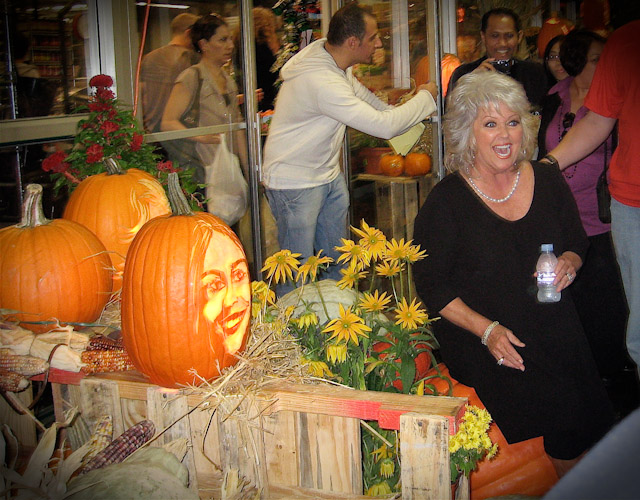
 Dame Paula Deen, amid mass fan hysteria (hysteria!), posing next to a pumpkin of her likeness (and Cat Cora's) at the Food Network festival at Chelsea Market a few years back. We were completely unsuspecting shoppers, caught, literally, in the swell. (Not unlike that terrified-looking couple coming out of the fish market behind her.) I am as big a fan of pumpkin carving and jack-o-lanterns as anyone, and definitely considered finally having a porch to put one on, one of the bigger perks of moving out of NYC. But I am equally as big a fan of pumpkins themselves, pumpkin seeds, pumpkin flesh, pumpkin vines, all of it. This time of year it is easy just to see said pumpkins as holiday flare. But particularly with tons (and tons!) of them at the markets right now, it is time to stock up and revel in all things orange and round. Seed Saving Save those seeds. They are utterly delicious roasted (more on that soon) and full of great nutritional benefits. But in addition, if you find a pumpkin variety you like, either for eating or carving, save the seeds and grow it yourself next year. Or as I pleasantly discovered this year, throw the seeds in your compost heap in the spring and they may go all jack-and-the-beanstalk on you, spill out onto the yard wherever they want and offer up some freebies by the fall. To save seeds for planting: 1. As you are scooping out the seeds and pulp for your jack-o-lanterns or cooking, reserve seeds in a colander. While gently rinsing under running water, pick out as much of the stringy pulp as possible. 2. Unless you are opening a pumpkin farm, you will end up with many more seeds than you could possible need for planting. Pick out the largest, and least blemished or damaged, seeds--about three times the amount of plants you wish to have next season. 3. Spread seeds out in a single, non-touching, layer on a flat surface lined with a couple of layers of paper towel (I use a cookie sheet). Place seeds in a dry area for several days, until all dried out. Transfer to a paper envelope, label, and store in a cool dry area until ready to sprout in the spring. When it is time to plant, either in the ground or starting seeds indoors ahead of time, you'll plant in groups of three, cutting back all but the strongest in each group after they have grown for a week or two. Thus the saving of three times the amount of seeds that you'll want to end up with. If you are saving seeds to roast (again, more on that in a day or two), you won't want to rinse them as thoroughly, as any remaining flesh residue adds to their marvelous flavor. Roasting Pumpkin Great pumpkins for carving and great pumpkins for eating are generally not the same variety. My favorite heirloom pumpkin that I grow for eating is the Long Island Cheese pumpkin. It is pale beige, flat and wide (would make a terrible jack-o-lantern) with an incredible dense, non-watery flesh, and a small seed cavity. You can find them more and more at farmers' markets now. Small, round, "sugar" pumpkins are also considered a standard for roasting and baking, and are widely available. 1. Heat the oven to 375 degrees F. 2. Wash any dirt and grit from the outside of the pumpkin. Carefully work your (sharpened) chef's knife around the pumpkin to cut it in half. Scoop out the seeds and stringy pulp. 3. Place the pumpkin halves, cut side down, on a lightly oiled baking sheet or dish. 4. Roast for 45 minutes, up to about an hour and a half, depending on the wide range of pumpkin sizes, until the skin of the pumpkin gives when pressed with your finger. Turn cut side of pumpkin up to cool (or it will overcook on the sheet). Scoop the pumpkin flesh out of the skin. If a particularly watery variety of pumpkin, allow the pumpkin flesh to drain briefly in a fine strainer for about twenty minutes. 5. If not using right away, transfer to an airtight container and store in the refrigerator for up to five days, or transfer to a freezer bag (removing as much air as possible) or container and freeze for six to eight months.
| ||||||||||||||||
|
{ welcome! }
 Catie Baumer Schwalb is a chef, food writer and photographer, who splits her life between the city and the country. Not too long ago Catie was a New York City based actress and playwright for more than a decade. She has her Master of Fine Arts from the National Theater Conservatory, and her Grand Diplôme in classic culinary arts from the French Culinary Institute in New York City.
... Read More ≫
Catie Baumer Schwalb is a chef, food writer and photographer, who splits her life between the city and the country. Not too long ago Catie was a New York City based actress and playwright for more than a decade. She has her Master of Fine Arts from the National Theater Conservatory, and her Grand Diplôme in classic culinary arts from the French Culinary Institute in New York City.
... Read More ≫{ get in touch }
{ what's new }
September 12, 2015
August 19, 2013
August 15, 2013
August 13, 2013
August 1, 2013
{ favorites }
{ archives }
Appetizers / Breads & Pastry / Breakfast / Cakes / Canning / Condiments / Dinner / DIY foods / Drinks / Fall / favorites / Grains / Holidays / Local / Noodles & Pasta / Pies & Tarts / Poultry / Salads / Seafood / Snacks / Soup / Spring / Summer / Sweets / Techniques / Vegetables / Vegetarian / Winter /
{ currently reading }
|


Leave a Reply