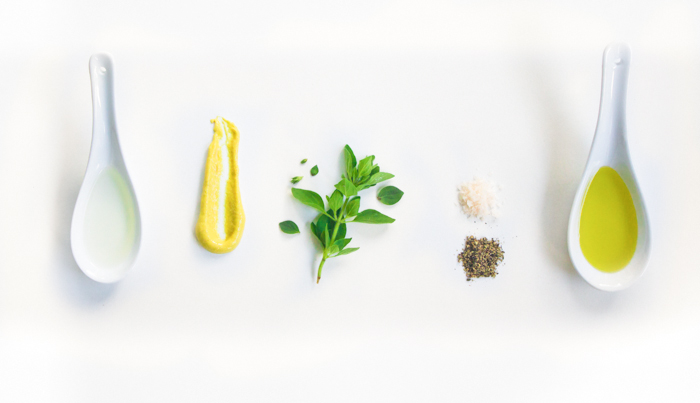
 For another step in my continued fight to close down the salad dressing aisle in grocery stores, I'll offer you a homemade salad dressing recipe each week. Fresh oregano certainly has a pronounced flavor, but actually so much more mellow and herbal and complex than what dried drab green flecks and pizza restaurant shakers have lead you to believe. We had this dressing last night on crisp fresh red leaf romaine, a small handful of fresh sorrel leaves (both sliced into ribbons, both from our garden), cucumber, and a generous handful of toasted sesame seeds. This vinaigrette would also be incredible on a salad of baby spinach, chickpeas and sliced hardboiled egg, or as a base for a potato salad. Also, P.S., oregano is probably the most idiot-proof herb to grow, super hearty, pops up first in the spring and faithfully returns each year. Grab a plant and stick it almost anywhere in your yard now for years of salad dressings and marinaras to come.
| ||||||||||||||||||||||


Full disclosure: in season or not, I use a lot of scallions. I love their subtle oniony vibe, pop of color, and exotic feel. I love their tubey shape and making thin cuts on an extreme angle for geometric garnishes. I love that they are equally useable raw or cooked. I LOVE them in my Homemade Scallion Pancakes and David Chang's Scallion Ginger Sauce from his Momofuku cookbook. So, each summer I faithfully devote an entire garden bed to growing my own scallions. And each year it is wildly unsuccessful. The seeds are microscopic, making it insanely difficult to evenly distribute them in the ground. When they do start to sprout up, in awkward clusters, they are the tiniest green threads, impossible to see and differentiate from the weeks that are intent on choking them out. But every year, I try, try again. So, cut to me on the subway a couple of weeks ago, overhearing a conversation between two adorable twenty-something hipsters, waxing poetic about the treasures on pinterest. Now I have not really explored pinterest, other than to see some referring pages that have come into my blog. And I have some mixed feelings about it from first glance. However, what I heard the DIYers going on and on about was the "growing scallions thing" on pinterest. Ok, I was curious and googled as soon as I got above ground. Apparently the scallion thing that has swept across the pinterestsphere, is the lesson that you can regenerate whole, perfectly edible scallions from the bottom tips that are usually cut off and tossed away. Yep. And I tried it. And yep. It works! Just place the root ends of scallions upright in about an inch of water and put in a sunny spot. In twenty four hours you will see some growth, and in just under a week they'll be full grown again. The only upkeep is to change the water every other day or so, which also helps cut down on any oniony smell. You can repeat the process three or four times with the same scallion tip. So excited to have a much more successful way of growing my own. And thrilled to add another vegetable to my eating local list--all year round. My apologies to the national scallion growers council.  | ||||||||||||||||


 It always is the case that this time of year is when I finally start to think about drying and putting away some fresh herbs from the garden. Maybe it is because I am so busy using them fresh in the previous months, or I'm subconsciously trying to put them away as late as possible to have them fresher longer (or I procrastinate...). Regardless, it is not until the the temperatures flirt a little with the upper 30s (like it did last week!) (and which can be the kiss of death, literally, for basil and other more delicate herbs) do I seem to motivate to do anything long-term with them. Along with the weather dipping lower, and Friday's first day of fall, I also start craving warm cups of tea, and, just as big marketing execs would want, start thinking ahead to the holidays. This project helps satisfy both categories.  Herbs at the Jean-Talon market in Montreal last month. Giant, and criminally inexpensive, bunches of gorgeous, fragrant, vibrant herbs are still available in the farmers' markets, and until a frost, perhaps in your yard or garden. Drying an assortment will give you great building blocks for your own herbal tea. Endlessly customizable, and super-natural, will be far more flavorful than anything that has been sitting on a store shelf for months and months. And putting away more than you need will also give you the raw materials for a lovely on-the-fly holiday gift. (more…) | ||||||||||||||||


Remember those old lady knickknacks of the late 70s of a flower completely frozen in a globe of lucite? There were a few geriatric abodes I visited during that era, and those stopped-in-their-tracks flowers were always a fascination. So perfect and yet so bizarrely frozen. You can make your own, a bit more ephemeral, version as another gorgeous use for edible flowers. Encase your posies in ice cubes to chic up late summer cocktails or mocktails. You can use any edible flowers for this project. The flower doesn’t impart all that much flavor to the cube or drink when simply frozen or floating, so it is possible to just focus on color. However, if you think they’ll be eaten, or floating around for a while after they’ve thawed, there are a few pairing ideas below. This is a super quick, nearly effortless way to bring some garden to your cocktail hour. I think it would also be a stunning addition to the season’s bridal and baby showers. Ring-a-round the spritzer, a pocket full of on the rocks. Directions: 1. Wash your flowers gently and carefully, making sure to get rid of any unsuspecting bugs so you don’t accidentally go all fossilized wooly-mammoth on your guests. Tiny, perfect flowers can be frozen whole, but large, somewhat less perfect blossoms, can be torn for an equally pretty effect. 2. In an ice cube tray, pour the slightest amount of water to just cover the bottom (which will be the top) surface. Place your flowers in, facing the bottom (so ultimately right-side-up) touching the thin layer of water as much as possible. Remember: The larger the ice cubes, the longer it will take them to melt… 3. Place trays in the freezer, until the first layer is solid. Remove from freezer, and top with a bit more water and another layer of flowers, if desired, or fill completely. 4. Return ice cube trays to the freezer until frozen and ready to use. Unmold and cheers! Ideas for Use: -- Clear drinks work best. This is even a great way to doll-up a simple glass of seltzer. -- Use flowers from mint, lemon verbena, chamomile, lemon balm, lavender, and even thyme for lemonade. -- Try mint, leaves and flowers, in ice cubes for mojitos -Try thai basil blossoms in ice cubes for thai basil mojitos. -Mint, chamomile, apple blossoms, rose petals and rose hips would be delish in iced tea. -Elderflowers or cucumbery Borage in a gin and tonic on a summer evening. Oh my.  | ||||||||||||||||


 Ever since the first time I whipped my own fresh whipped cream, I have kept my gaze obcessively glued to it, in dreaded fear of over-whipping and having it turn into butter. The horror! Imagine! And so to this day I anxiously sweat that critical make or break, stiff peak to useless butter, moment. But wait...I can turn cream into butter? Thus making my own butter? And that easily? Well, yes, yes, and yes. I finally gave it a try this week, gleefully letting my mixer plow right through from beautiful lofty whipped cream to deflated heavier looking cream-paste to cheerful little golden globules of butter separating from ivory buttermilk. And all in about ten minutes. The transformation was kind of thrilling, and the result revelatory. A pint of heavy cream yielded about 6.5 ounces of butter and a cup and a half of buttermilk. Pound for pound this is will end up being a bit more costly than store-bought. However, I found the taste superior and just fresher all around, and it didn't have the "natural flavorings" that I just noticed on the ingredient list of my butter package. I cannot wait to try it with the outstanding, abundantly flavorful, local cream from farmers at the markets. There are also plenty of times when I have bought heavy cream for a recipe, or had extra whipped cream left over from a dinner, and wish I had used it to whip up some butter, rather than having it sit in my refrigerator waiting for another recipe to come up. This is a remarkably easy process and tremendously satisfying. Of all of the challenging and technical cooking projects I have attempted it is amazing that I haven't tried this before, as it is most definitely simpler than most. Give it a try. Slip some on the table at your next gathering. "Oh that? I just whipped that up." (more…) | ||||||||||||||||


|
|
{ welcome! }
 Catie Baumer Schwalb is a chef, food writer and photographer, who splits her life between the city and the country. Not too long ago Catie was a New York City based actress and playwright for more than a decade. She has her Master of Fine Arts from the National Theater Conservatory, and her Grand Diplôme in classic culinary arts from the French Culinary Institute in New York City.
... Read More ≫
Catie Baumer Schwalb is a chef, food writer and photographer, who splits her life between the city and the country. Not too long ago Catie was a New York City based actress and playwright for more than a decade. She has her Master of Fine Arts from the National Theater Conservatory, and her Grand Diplôme in classic culinary arts from the French Culinary Institute in New York City.
... Read More ≫{ get in touch }
{ what's new }
September 12, 2015
August 19, 2013
August 15, 2013
August 13, 2013
August 1, 2013
{ favorites }
{ archives }
Appetizers / Breads & Pastry / Breakfast / Cakes / Canning / Condiments / Dinner / DIY foods / Drinks / Fall / favorites / Grains / Holidays / Local / Noodles & Pasta / Pies & Tarts / Poultry / Salads / Seafood / Snacks / Soup / Spring / Summer / Sweets / Techniques / Vegetables / Vegetarian / Winter /
{ currently reading }
|


